Colorful Valentine Play Dough Cookie Pops: A Fun & Easy Homemade Treat for Kids
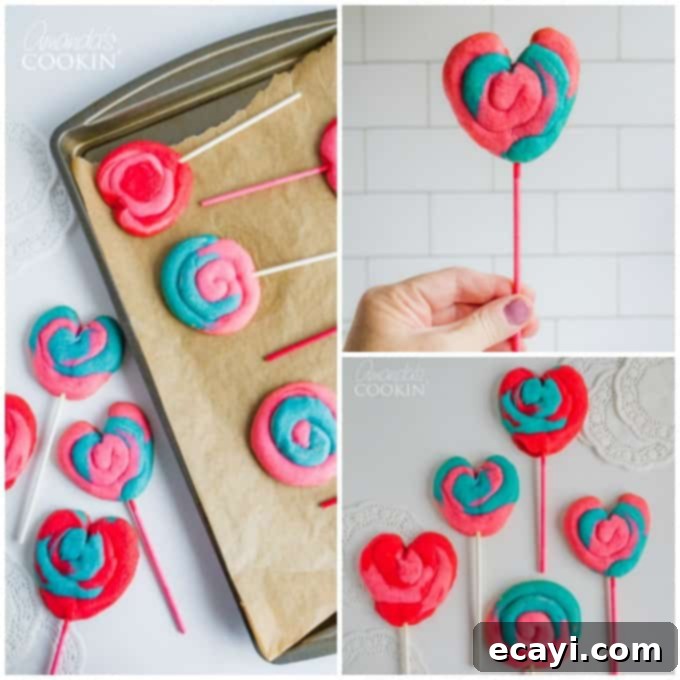
Get ready to unleash a burst of color and joy this Valentine’s Day with these truly delightful Valentine Play Dough Cookie Pops! They are not just cookies; they’re an experience waiting to happen, offering a fantastic opportunity for kids to get creative in the kitchen. While they aren’t actually made from real play dough, their vibrant, swirled colors and malleable texture during preparation will instantly remind you of it, sparking imagination and excitement. These edible works of art are perfect for little hands to help shape, decorate, and ultimately, share with friends, teachers, or loved ones.
Imagine the smiles these charming treats will bring! Their unique appearance makes them stand out from traditional Valentine’s Day sweets. You can even shape them into adorable hearts, just like our beloved Heart Shaped Valentine Cupcakes, to make them an even more special and festive goodie for the season of love. These cookie pops combine the simple pleasure of a sugar cookie with an exciting, visually appealing twist, making them a memorable gift or a delightful addition to any Valentine’s celebration.

Why These Valentine Play Dough Cookie Pops Will Be Your New Favorite
These aren’t just any cookies; they are a delightful fusion of taste and playful artistry. Here’s why these Play Dough Cookie Pops are poised to become a staple in your Valentine’s Day baking traditions:
- Kid-Friendly Fun: The process of coloring, rolling, and shaping the dough is incredibly engaging for children. It’s a sensory experience that encourages creativity and fine motor skills, making baking a memorable activity rather than just a chore.
- Visually Stunning: The swirls of vibrant colors—think reds, pinks, purples, and whites—mimic the look of real play dough, creating an eye-catching treat that’s almost too pretty to eat. They add a festive and whimsical touch to any Valentine’s spread.
- Deliciously Simple: At their core, these are classic sugar cookies, known for their buttery taste and delightful texture. The recipe is straightforward, ensuring a successful bake even for novice bakers.
- Perfect for Gifting: Presented on lollipop sticks, these cookies are easy to handle and make charming individual gifts. Wrap them in small cellophane bags with a pretty ribbon, and you have instant homemade Valentine’s Day presents.
- Long-Lasting Freshness: Unlike some cookies that quickly lose their charm, these cookie pops maintain their delicious taste and tender texture for days, making them ideal for preparing in advance.
Whether you’re looking for a fun project to do with your kids, a unique treat to share, or a vibrant dessert for a party, these Play Dough Cookie Pops tick all the boxes. They are a celebration of color, creativity, and classic cookie goodness.
The Magic Behind These “Play Dough” Inspired Cookies
The secret to these whimsical “Play Dough” cookies lies in a simple yet effective technique: tinting a versatile sugar cookie dough with paste food coloring. This method allows for brilliant, saturated hues without altering the cookie’s flavor or texture. Our recipe starts with a foundational sugar cookie dough, enriched with cream cheese for an extra touch of tenderness and a slightly tangy note that beautifully balances the sweetness.
Once the dough is prepared, the fun truly begins. It’s divided into portions, and each portion is kneaded with a different color of paste food coloring. Paste food coloring is highly recommended over liquid varieties because it provides intense color without adding excess moisture to the dough, which could affect the cookie’s consistency. This vibrant palette then transforms into individual balls, which are carefully combined and rolled into “snakes” of dough. These colorful snakes are then twisted and coiled, creating mesmerizing marble or spiral patterns that are utterly unique to each cookie.

Tips for Crafting Perfect Play Dough Cookie Pops
- Dough Chilling is Key: Don’t skip the chilling step! Refrigerating the tinted dough for at least 2 hours is crucial. It allows the butter to firm up, preventing the cookies from spreading excessively in the oven and helping them maintain their intricate shapes and vibrant colors.
- Achieving Vibrant Colors: Use gel or paste food coloring for the best results. A small amount goes a long way to achieve bright, saturated colors. Add it incrementally and knead thoroughly until the desired hue is reached. Wear gloves to keep your hands clean!
- Creative Color Combinations: For Valentine’s Day, think classic reds, pinks, and whites. You can also add purples for a multi-faceted look. Don’t be afraid to experiment with 3 or 4 colors per cookie for a truly dynamic “play dough” effect.
- Rolling and Shaping: When combining the different colored dough balls, roll them together gently just enough to form a rough, larger ball. The goal is to see distinct colors, not to blend them entirely. When forming the “snake,” aim for an even thickness to ensure uniform baking.
- Heart Shaping Made Easy: After coiling your round cookie and inserting the stick, use your fingers to gently pinch the bottom of the circle into a point. Then, with a separate lollipop stick or the back of a butter knife, press down lightly on the top center of the circle to create the indentation for the heart shape. Smooth any edges with your fingers.
- Preventing Sticking: Lightly grease your baking sheet or, even better, line it with parchment paper or a silicone baking mat. This ensures your beautiful cookie pops slide off easily once baked and cooled.
Making Them Last: Storage and Freshness
One of the many great things about these Valentine Play Dough Cookie Pops is their impressive shelf life. We conducted a rigorous (and delicious) taste test, wrapping them in plastic wrap and sampling one each day. The verdict? They tasted just as wonderful on the sixth day as they did fresh out of the oven! This makes them an excellent choice for making ahead of time, especially if you’re planning to give them as gifts or prepare for a party.
To keep your cookie pops at their best, store them in an airtight container at room temperature. If you’ve got extra space in the refrigerator, that works too, but it’s generally not necessary. For longer storage, you can freeze the baked and cooled cookie pops in a freezer-safe container or bag for up to 2-3 months. Thaw them at room temperature before serving. Their delightful texture and vibrant colors will remain intact, ensuring a fresh and flavorful treat whenever you’re ready to enjoy them!

Valentine Playdough Cookie Pops Ingredients
- 3/4 cup butter, softened: Using softened butter is essential for achieving a smooth, creamy mixture with the sugar and cream cheese, contributing to the cookie’s tender texture.
- 1 teaspoon vanilla extract: A staple in most cookie recipes, vanilla extract enhances all the other flavors, adding a warm and inviting aroma.
- 3 ounces cream cheese: The secret ingredient for extra chewiness and a subtle richness that elevates these sugar cookies above the ordinary.
- 1 cup white sugar: Provides the classic sweetness and helps with the cookie’s browning and crispy edges.
- 2 3/4 cups all-purpose flour: The main structural component of our dough, providing the perfect balance for holding shapes and maintaining a tender crumb.
- 1 egg: Acts as a binder, helping to hold the dough together and adding richness.
- 1 teaspoon baking powder: Gives the cookies a slight lift, ensuring they’re not too dense.
- 1/4 teaspoon salt: A pinch of salt is crucial for balancing the sweetness and enhancing the overall flavor profile of the cookies.
- Assorted colors of paste food coloring: Essential for creating those vibrant, “play dough” inspired hues. Paste or gel food coloring is recommended for intense colors without adding excess liquid.
- 24 lollipop sticks: The key to transforming these colorful cookies into fun, portable pops, making them easier to eat and ideal for gifting.
Helpful Kitchen Tools for Easy Baking
Having the right tools can make your baking experience much smoother and more enjoyable. Here are a few essentials:
- Stand mixer or hand mixer: Perfect for creaming butter, cream cheese, and sugar until fluffy, saving you time and arm strength.
- Baking sheet: A sturdy baking sheet is a must for evenly baked cookies. For best results, line it with parchment paper.
- Food coloring: Opt for gel or paste food coloring to achieve vivid colors without altering the dough consistency.
- Lollipop sticks: Make sure to have enough for all your cookie pops. These are usually available in craft stores or baking sections of supermarkets.
Step-by-Step Guide: How to Make Play Dough Cookie Pops
Follow these detailed instructions to create your own batch of dazzling Valentine Play Dough Cookie Pops:
- Cream the Wet Ingredients: In a large mixing bowl, using either a stand mixer with the paddle attachment or a hand mixer, cream together the softened butter, cream cheese, and white sugar until the mixture is light, fluffy, and well combined. This usually takes about 2-3 minutes. Next, add the large egg and vanilla extract, beating again until the mixture is completely smooth and homogeneous. Scrape down the sides of the bowl as needed to ensure everything is fully incorporated.
- Combine Dry Ingredients and Tint Dough: In a separate, medium-sized bowl, whisk together the all-purpose flour, baking powder, and salt. Gradually add these dry ingredients to your creamed mixture, stirring on low speed until a soft dough begins to form. Be careful not to overmix; stop as soon as the flour is just incorporated. Now, divide the dough into as many portions as you have colors of paste food coloring. For example, if you’re using three colors (red, pink, white), divide it into three equal portions. Tint each portion with a different food color, kneading the color thoroughly into the dough until a uniform, vibrant shade is achieved. Wrap each colored dough portion tightly in plastic wrap and chill in the refrigerator for at least 2 hours. This chilling step is essential for firming up the dough, making it easier to handle and preventing the cookies from spreading too much during baking.
- Prepare for Baking and Shape the Dough: Preheat your oven to 350 degrees F (175 degrees C). Once the dough is chilled, take it out of the refrigerator. For each cookie pop, pinch off small, 3/4-inch balls from 3-4 different colored doughs. Gently press these colored balls together to form one larger, multi-colored ball. Roll this larger ball just enough to combine the colors roughly, then shape it into a 12-inch long roll, resembling a thin snake. The goal is to create a multi-colored log without fully blending the colors.
- Coil and Insert Sticks: Starting at one end of your colored dough “snake,” carefully coil the roll into a flat, round spiral shape, approximately 2 3/4 inches in diameter. This creates the signature “play dough” look. Place the formed cookies about 3 inches apart on a lightly greased baking sheet (or one lined with parchment paper). Carefully insert a lollipop stick into the bottom center of each cookie, pushing it about halfway into the dough to ensure it’s securely held. Ensure the stick is straight and doesn’t protrude too far through the top.
- Shape into Hearts (Optional but Recommended!): For an extra Valentine’s touch, you can transform the coiled round cookies into hearts. Follow steps 1-4 for forming the multi-colored dough ball, rolling it into a snake, and coiling it. After inserting the lollipop stick into the bottom of the coiled circle, use your fingers to gently squeeze the dough at the very bottom of the circle, shaping it into a point and pressing it against the stick. Then, use a separate lollipop stick or the back of a small butter knife to create an indent in the top center of the coiled circle, pushing down slightly and shaping the two “lobes” of the heart. Smooth out any rough edges with your fingertips to create a perfect heart shape.
- Bake and Cool: Bake the cookies for approximately 8 minutes, or until the edges are lightly golden brown. Be careful not to overbake, as sugar cookies can quickly become too crispy. Once baked, remove the baking sheet from the oven and let the cookies cool on the sheet for a few minutes before carefully transferring them to a wire rack to cool completely. Cooling completely is important for the cookies to set and for the sticks to remain securely in place. Store the cooled cookie pops in an airtight container to maintain their freshness and delightful texture.
There you have it! A simple and incredibly fun way to make gorgeous Valentine’s Day treats that will surely bring smiles to everyone’s faces. Enjoy the process and the delicious results!

Gifting and Serving These Festive Treats
These Valentine Play Dough Cookie Pops are more than just a dessert; they are a charming gesture. Once cooled, these festive treats look absolutely adorable wrapped individually in small decorative treat bags, tied with a pretty ribbon. Imagine giving these handmade delights to classmates, coworkers, neighbors, or grandparents – who could resist such a thoughtful and colorful gift?
They are perfect for school parties, potlucks, or simply as a special homemade surprise for your family. Arrange them upright in a decorative vase or a block of floral foam for a stunning edible centerpiece. Their cheerful colors and unique presentation make them an instant hit, adding a touch of personalized sweetness to any occasion. Everyone loves a sweet, heart-shaped sugar cookie, especially when it comes with such an inviting, playful aesthetic!

We hope you and your loved ones enjoy making and eating these delightful Play Dough Cookie Pops as much as we do. They truly embody the spirit of Valentine’s Day: fun, colorful, and full of love!
More Valentine’s Day Recipes You’ll Adore
The season of love calls for all things heart-shaped, sweet, and full of warmth! If you’re inspired by these cookie pops and looking for more delightful treats to celebrate Valentine’s Day, explore some of our other cherished recipes. From decadent truffles to comforting baked goods, there’s something to make every heart happy:
- Heart Oreo Truffles
- Valentine’s Mudslide
- Chocolate Covered Fruit Truffles
- Red Velvet Oatmeal Fudge Bars
- Conversation Heart Brownies
- Red Velvet Fudge
- Cupid’s Cocktail
- Chocolate Chip Cookies for Two
- Valentine Cherry Hand Pies
- Conversation Heart Cookies

Valentine Play Dough Cookie Pops
IMPORTANT – There are often Frequently Asked Questions within the blog post that you may find helpful. Simply scroll back up to read them!
Print It
Pin It
Rate It
Save ItSaved!
Ingredients
- ¾ cup butter softened
- 3 ounces cream cheese
- 1 cup white sugar
- 1 large egg
- 1 teaspoon vanilla extract
- 2 ¾ cups all-purpose flour
- 1 teaspoon baking powder
- ¼ teaspoon salt
- assorted colors of paste food coloring
- 24 lollipop sticks
Instructions
-
In a bowl cream butter, cream cheese and sugar until fluffy. Add egg and vanilla; beat until smooth.
-
In a medium bowl combine flour, baking powder and salt. Add dry ingredients to the creamed mixture. Stir till soft dough forms. Divide dough according to however many colors you plan to use. Tint each with a different food color. Wrap in plastic wrap and chill for 2 hours.
-
Preheat oven to 350 degrees F. Shape dough into 3/4 inch balls and for each cookie place 3-4 different colored balls together to make 1 large ball. Roll it just enough to form a rough ball, then shape into a 12-inch long roll (like a snake).
-
Starting at one end, coil roll to make a 2 3/4 inch round cookie. Place cookies 3 inches apart on lightly greased baking sheet. Carefully insert lollipop sticks into bottoms of cookies.
-
For hearts, follow the instructions above. After inserting the stick, use your fingers to squeeze the dough at the bottom of the circle and combine at the stick, then use a separate lollipop stick or a butter knife to create an indent in the top and shape the heart.
-
Bake cookies for 8 minutes or until lightly browned. Cool and store in an airtight container.
Nutrition
The recipes on this blog are tested with a conventional gas oven and gas stovetop. It’s important to note that some ovens, especially as they age, can cook and bake inconsistently. Using an inexpensive oven thermometer can assure you that your oven is truly heating to the proper temperature. If you use a toaster oven or countertop oven, please keep in mind that they may not distribute heat the same as a conventional full sized oven and you may need to adjust your cooking/baking times. In the case of recipes made with a pressure cooker, air fryer, slow cooker, or other appliance, a link to the appliances we use is listed within each respective recipe. For baking recipes where measurements are given by weight, please note that results may not be the same if cups are used instead, and we can’t guarantee success with that method.

This post was originally published on this blog on Jan 19, 2014, and has since been updated with additional insights, detailed tips, and enhanced content to ensure your baking experience is as delightful and successful as possible.
