Mastering French Macarons: The Ultimate Step-by-Step Guide to Perfect Homemade Delights
Unlock the secrets to baking exquisite French macarons right in your own kitchen! This comprehensive tutorial offers everything you need: detailed step-by-step instructions, insightful photos, expert tips, inspiring flavor variations, crucial troubleshooting resources, and even an exclusive video masterclass to guide you.

This post contains affiliate links. Full disclosure is at the bottom of the article.
French macarons hold a special place in my heart, a true culinary obsession. My journey into the world of these delicate confections began nearly two decades ago, with a transformative tasting experience at Pierre Hermé in Paris. That moment ignited a passion that sent me down a delightful, albeit challenging, rabbit hole. Returning home, I was utterly captivated by macarons. Subsequent trips to Paris included intensive classes to learn their intricate craft. Yet, as I experimented in my own kitchen, I quickly discovered that mastering French macarons is far from easy; it demands immense patience, precision, and an understanding of their unique nature. I learned, often through trial and error, that French macarons are wonderfully capricious little wonders: even the slightest deviation in ingredient ratios or technique can throw off their delicate balance. Over the years, I’ve seen countless trays of overbaked, flat, cracked, or excessively puffed macarons emerge from my oven!
Through persistent dedication, countless attempts, and meticulous adjustments, I gradually perfected my technique and refined my recipe. Eventually, I felt confident enough to begin teaching others the art of macaron making. It’s important to understand that no single macaron recipe can guarantee perfect results every time. Success hinges on a combination of personal attributes and disciplined execution. Here’s what you truly need to become a successful French macaron maker:
- Time: Dedicate a generous couple of hours in your schedule for your initial attempt. Macaron making isn’t a rush job. To make the process smoother, prepare your fillings in advance, allowing you to focus solely on the intricate shell-making when you have dedicated time.
- Patience: Before you even think about cracking an egg, read the entire recipe meticulously, several times over. Familiarize yourself with every step and nuance. Resist the urge to rush; patience is your most valuable ingredient.
- Practice: Every kitchen, oven, and set of ingredients is unique. Test this recipe with your specific equipment and ingredients. Pay close attention to how your meringue forms, how your batter behaves, and how your oven bakes. Adjust as needed – this personalized understanding is crucial.
- Resilience: Your first batches of macarons might not be Instagram-perfect. You might even experience complete failures, and that’s absolutely normal. Embrace every batch, successful or not, as a learning opportunity. Each attempt will teach you something new about the process, and this accumulated knowledge is how you’ll ultimately master them.
It’s highly probable that you will need to bake French macarons multiple times before you achieve what *you* consider perfection—a result that genuinely makes you happy and proud. After all, if these exquisite French pastries were simple to create, wouldn’t everyone be making them effortlessly?
With years of experience, I’ve found that one of the most effective ways to learn proper macaron technique is by watching someone demonstrate it. This post aims to be as close as still photos can get you to a live, step-by-step demonstration. However, if you prefer a more dynamic learning experience, I highly recommend you watch my FREE, detailed French Macaron Video Masterclass on YouTube. This is the place where I reveal ALL my hard-earned secrets, valuable tips, and detailed techniques to help you make truly perfect French macarons.
Essential Learning: My French Macaron Video Masterclass
Embark on your journey to making perfect French macarons at home with my comprehensive video masterclass, now freely available for unlimited watching! This highly-rated masterclass was previously a premium offering on an educational platform, where it garnered THOUSANDS of 5-STAR ratings from students. I am thrilled to now offer it to macaron enthusiasts worldwide, completely free of charge ❤️
My detailed French Macaron Video Masterclass is intelligently structured into 14 easy-to-digest lessons, designed to transform you into a macaron expert swiftly. I created this masterclass for both enthusiastic novice bakers eager to acquire new skills and seasoned bakers looking to master an impressive and challenging dessert. Allow me to guide you through the essential equipment you’ll need, the critical steps to follow precisely, the delicate techniques to master, and the common pitfalls to skillfully avoid. You have the flexibility to watch the videos at your own pace, practice the techniques, share this valuable resource with other aspiring macaron makers, and feel free to ask me questions if you encounter any difficulties during your baking adventures.
I am genuinely confident that by following this video course, you will be well-equipped to create beautiful and delicious French macarons. Start your learning journey by watching the class now!
If you find my French Macaron Masterclass beneficial and enjoyable, please consider giving it a “like” on YouTube. Your support helps other passionate macaron lovers discover this valuable free resource. Thank you, and happy baking!
Struggling with Macarons? Find Your Answers Here!
Since this post’s initial publication in 2010, I’ve received an endless stream of questions from macaron-makers facing every conceivable challenge. After personally responding to hundreds, if not thousands, of comments over the years, I’ve consolidated all that wisdom into an invaluable resource. While comments on my macaron posts are now closed, I direct everyone to my comprehensive Macaron Troubleshooting Guide: Useful Tips and Advice to Master the French Delicacy. This dedicated post meticulously compiles ALL of the most frequently asked questions and common issues I’ve encountered regarding French macarons over the past decade. If you’re experiencing any difficulties with your macaron baking, I am confident you will find detailed answers and practical solutions within that guide.
You may also still browse through the older comments section below this post. I made every effort to reply to all of them, and many macaron-related issues (if not all!) are addressed there as well.
Should you find that something critical has been missed, please don’t hesitate to send me a note! I am committed to regularly updating my troubleshooting resources with new insights and emerging issues.
French Macarons: The Basic Recipe + Essential Tips for Success
CLICK HERE TO JUMP TO A PRINTABLE VERSION OF THE RECIPE
Successfully baking perfect French macaron shells is undoubtedly the most challenging aspect of this culinary endeavor, and it’s where you’ll need the most focused practice. It is highly recommended that you first master the art of successfully baking basic French macarons before venturing into adding more complex flavors or colors. This foundational success will build your confidence and understanding of the core technique.
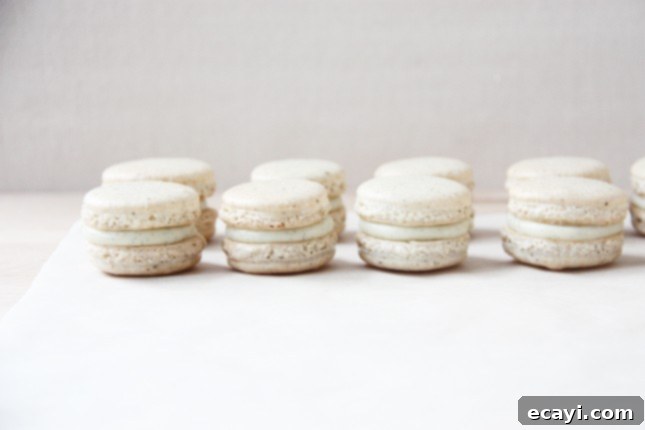
How to Get Prepared for Making French Macarons
Embarking on French macaron making requires a bit of thoughtful advance planning. Don’t underestimate this preparatory phase, as it significantly contributes to your success.
- (Up to) One week before making French macarons: Gather all the necessary equipment and ingredients. Macarons often require specific tools and precise ingredient forms (like finely ground almond flour). You might need to order items online or visit a specialty store. Refer to the comprehensive list below to ensure you have everything ready.
- Two days before making French macarons: This step is critical for developing stable egg whites. Carefully separate your large eggs, placing the whites into a meticulously clean glass container. Reserve the yolks for another delicious use. Leave the egg whites uncovered and refrigerate them for 24 to 48 hours. This aging process helps dry out the egg whites slightly, leading to a more stable meringue.
- The morning of the day you plan to make macarons: Remove the aged egg whites from the refrigerator and allow them to come to room temperature for several hours. Room temperature egg whites whip up more volume and create a more consistent meringue.
The Essential Equipment You Need to Make French Macarons
Before you begin, gather every piece of equipment listed below. Macaron making demands precision, and having the right tools at hand is non-negotiable. Yes—that kitchen scale, for instance, is absolutely required for accurate measurements. The excellent news is that none of these tools are exclusive to macarons, so your new gadgets will be valuable additions for countless other baking projects. Consider this your perfect excuse to go shopping!
- Kitchen scale (absolutely essential for precise weighing, which is critical for macarons)
- Food processor (highly recommended for achieving a super-fine almond flour and powdered sugar mixture, though not strictly mandatory; see Step 2 for alternatives)
- Hand mixer or stand mixer (essential for whipping egg whites into a stable meringue)
- Fine mesh strainer (crucial for removing any larger lumps from your dry ingredients, ensuring smooth shells)
- Large stainless steel bowl (often called a cul-de-poule, preferred for whipping egg whites due to its non-reactive surface and ability to maintain coolness—not required if using a stand mixer, as you’ll use its bowl)
- A second large mixing bowl (for mixing dry ingredients)
- Silicone spatula (essential for the delicate macaronnage process, as it won’t deflate the meringue)
- Pastry bags (I highly recommend using large disposable bags for hygiene and ease of use; see Step 7)
- Round pastry tips (with a 1/2 to 3/4 inch opening, equivalent to sizes 6 to 8, for uniform piping)
- Baking sheets, preferably 2 to 4 of them (having multiple allows for continuous baking and resting; see Step 6)
- Parchment paper (I recommend using pre-cut parchment paper sheets, which perfectly fit standard half sheets and prevent curling)
- Gel food coloring, if desired (gel is preferred as it doesn’t add excess moisture)
The Ingredients You Need to Make French Macaron Shells
Precision in ingredients is key for macarons. Use high-quality products for the best results.
- Egg whites: 3 large eggs, carefully separated at least 24 hours in advance and aged in the refrigerator (approximately 3.5 oz / 100g)
- Powdered sugar (also known as confectioner’s sugar): 210 g
- Almond flour (also called ground almonds or almond meal): 125 g
- Granulated sugar: 30 g
- Cream of tartar (a meringue stabilizer): 1/4 tsp
How to Make French Macaron Shells: A Step-by-Step Guide
Each step in macaron making is crucial. Follow these instructions carefully for the best chance of success.
STEP 1: PROCESSING THE ALMOND FLOUR AND POWDERED SUGAR TOGETHER
Accurately weigh the powdered sugar and almond flour. Transfer both into the bowl of your food processor. Process these two ingredients together for one to two minutes until they are very finely ground. Stop the processor, scrape down the sides and bottom of the bowl to ensure no bits are missed, then process again for another minute. This step ensures an incredibly smooth macaron shell.
Yes, this step is absolutely necessary, even if both ingredients are already in powdered form. Processing them together achieves a uniform, super-fine consistency, thoroughly blending the sugar and nuts and breaking down any larger almond bits that might be present in pre-packaged almond flour.
Tips for grinding almonds: You can grind whole almonds if you prefer. Use raw almonds, either unpeeled or blanched. Keep in mind that unpeeled almonds will result in macaron shells with a slightly speckled, rustic appearance. To prevent the almonds from turning into butter, always grind them together with the powdered sugar. The sugar absorbs the oils, preventing the mixture from becoming paste-like.
If you don’t have a food processor, you can still make macarons. In this case, ensure you thoroughly blend the almond flour and powdered sugar together manually before sieving. Be aware that the texture of your finished macarons might not be as perfectly smooth without the processor.
STEP 2: SIEVING THE ALMOND FLOUR/POWDERED SUGAR MIXTURE
After processing the powdered sugar and almond flour, the next critical step is to sieve the mixture. Pass the entire mixture through a fine-mesh strainer. This step is incredibly important (especially if you skipped the food processor) as it will eliminate any remaining larger bits of almond and ensure a perfectly smooth, lump-free batter. You will inevitably find some almond pieces that refuse to pass through the sieve; do not try to force them. It’s perfectly fine to discard these coarser bits. If the amount of larger refuse is less than 1 teaspoon, your ingredient ratio will remain accurate and unaffected.
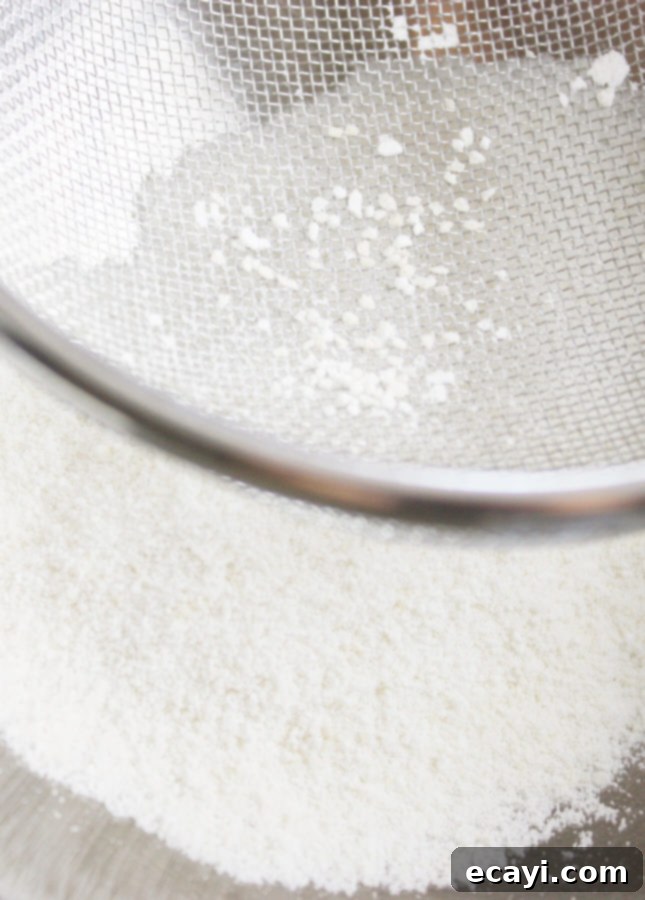
Once sieved, set these finely blended dry ingredients aside.
STEP 3: BEATING THE EGG WHITES (Crafting the Meringue)
Retrieve a large stainless steel bowl. These bowls, known as culs-de-poule in French, are incredibly versatile in the kitchen. If you don’t own one, consider investing in a small and a large size. They often come in sets of 3 to 5, but a couple will suffice for most needs. Stainless steel bowls are excellent for achieving fluffy and firm egg whites due to their non-reactive surface and ability to stay cool. If you’re using a stand mixer, its mixing bowl will work perfectly.
Ensure your bowl is cold. Stainless steel naturally retains coolness. If the bowl feels warm or has just been washed with hot water, rinse it under cold running water, then dry it thoroughly before use. For an extra chill, you can place the bowl in the freezer for a few minutes. A cold bowl significantly aids in achieving the best volume and stability from your egg whites.
Measure your granulated sugar and keep it within easy reach. Place the room-temperature egg whites and the cream of tartar into the cold stainless steel bowl. Begin beating them at medium-high speed with your mixer. After about a minute or two, when the egg whites start to become bubbly and whiter, and the whisk begins to leave faint marks, gradually add one tablespoon of the granulated sugar.
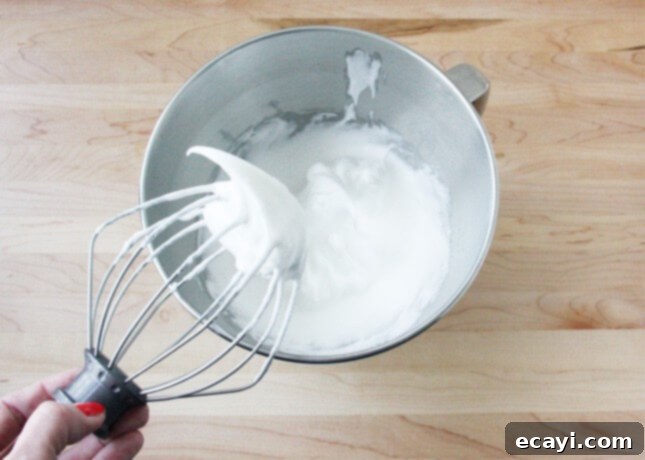
Continue beating the egg whites, slowly pouring in the remaining granulated sugar over the next one to two minutes. At this point, the egg whites will appear white and fluffy but won’t yet be stiff enough. Increase the mixer speed to high and continue whisking until stiff, glossy peaks form and hold their shape when you lift the whisk. When the meringue is ready, you’ll observe that it appears dense, creamy, and less “airy,” holding a firm structure.
Here’s a visual representation of how the egg whites (meringue) should look at this crucial stage:
STEP 4: ADDING COLOR (Optional)
Once your meringue is perfectly stiff, set aside your electric mixer. From this point onward, the beaten egg whites—your meringue—must be handled with the utmost care and gentleness.
If you desire to color your macaron shells, now is the ideal time to incorporate the food coloring. Add a few drops of gel food coloring (gel is preferred as it doesn’t introduce excess moisture) to the meringue. Using your silicone spatula, gently fold in the color. Employ a specific folding technique: slide the spatula along the side of the bowl down to the bottom, then sweep it back up towards the center of the bowl. Repeat this motion 3 to 4 times to begin distributing the color. The color will fully integrate and deepen when you combine the almond/sugar mixture in the next step. Crucially, DO NOT whisk the meringue at any cost, as this will rapidly deflate your carefully whipped egg whites and ruin your batter’s consistency.
At this stage, if you’ve added food coloring, the color of your macaron batter should be at least as vibrant and intense as you envision the final baked macaron to be. Be aware that the color typically fades slightly once the almond/sugar mixture is fully incorporated.
STEP 5: MACARONNAGE (Incorporating the Almond/Sugar Mixture into the Meringue)
Pour approximately half of your sieved sugar and almond mixture over the meringue. Using your silicone spatula, gently begin to fold it in. Continue the same folding motion: slide the spatula along the side of the bowl down to the bottom, then pull back up towards the center. This initial folding will cause the egg whites to deflate a little, which is an expected and normal part of the process. Once the first half of the dry mixture is mostly incorporated, add the remaining portion to the bowl and continue folding.
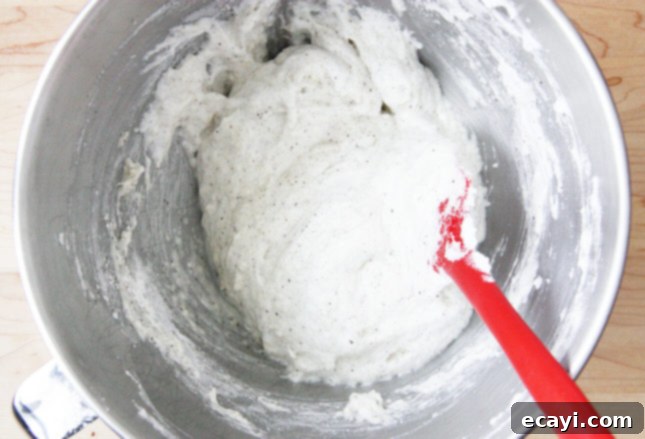
Now is the moment to pay extremely close attention, as this is the most critical stage.
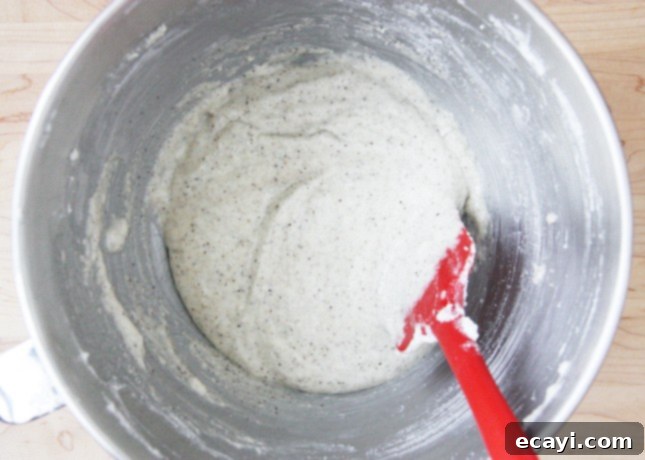
Initially, the macaron mixture will appear somewhat curdled and lumpy. As you continue to fold, it will gradually become homogenous, smooth, and noticeably looser. The macaron batter is perfectly ready when it is just loose enough to slowly and lazily drip from your spatula in a continuous, thick ribbon. This is known as the “ribbon stage” or “lava-like” consistency. It should not break quickly but flow slowly and merge back into the main batter after about 10-20 seconds.
Accurately recognizing when the batter has reached this precise consistency is the absolute key to successfully making French macarons.
Learning to identify the ribbon stage is crucial because the final appearance and structure of your macaron shells depend entirely on it. If you underfold the batter, it will be too stiff, and your shells might not develop their characteristic “feet” (the ruffled base). Conversely, if you overfold the batter, it will become too loose and runny, causing the shells to spread unevenly when piped onto the baking sheets. Overfolded batter can also lead to cracking during the baking process, producing hollow or fragile shells.
When the macaron batter has been perfectly blended and reached the ribbon stage, it should look wonderfully shiny, smooth, and creamy:
STEP 6: PREPARING THE BAKING SHEETS
For optimal results, if possible, stack two baking sheets together. The extra layer of air between the sheets provides insulation, helping the macarons to rise more evenly and cook gently from the bottom, preventing excessive browning. Cover the top baking sheet with a precisely cut piece of parchment paper. The paper should lie perfectly flat across the bottom of the baking sheet and not extend up the sides, as this can cause the delicate macaron shells to warp or lose their shape during baking. Pre-cut parchment paper sheets are incredibly convenient as they are sized perfectly for standard half sheets. I strongly advise against using a silicone baking mat for macarons: their rubbery texture often causes the delicate and somewhat sticky cookies to cling stubbornly, frequently resulting in empty shells where the tender insides remain stuck to the mat.
If you desire uniform macaron sizes, you can slide macaron templates under the parchment paper before piping.
STEP 7: PIPING THE MACARON SHELLS
Fit your pastry bag with its chosen round pastry tip. I personally prefer using disposable pastry bags; I often wash and reuse them 3-4 times before discarding. Disposable plastic bags offer more flexibility and are generally easier to work with than traditional textile bags. They also won’t stain and are incredibly simple to clean by just running hot water through them.
To easily transfer the macaron batter into the pastry bag, place the bag inside a tall measuring cup. To prevent the batter from flowing out prematurely, fold or twist the pastry tip end of the bag, then fold down the top part of the bag (creating a cuff). This makes it much simpler to spoon the batter into the bag and push it down towards the tip.
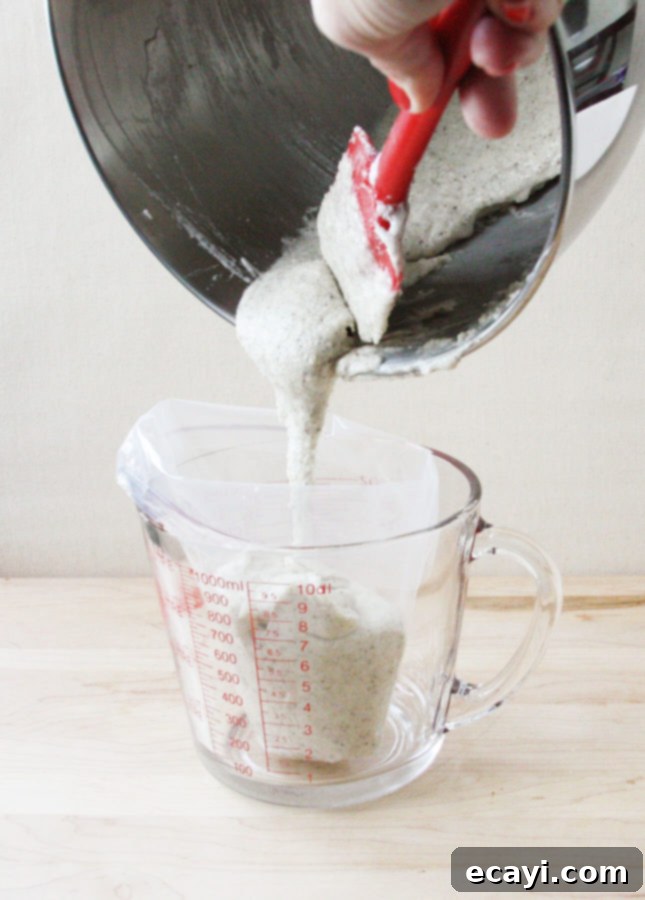
Carefully transfer all the prepared macaron batter into the pastry bag.
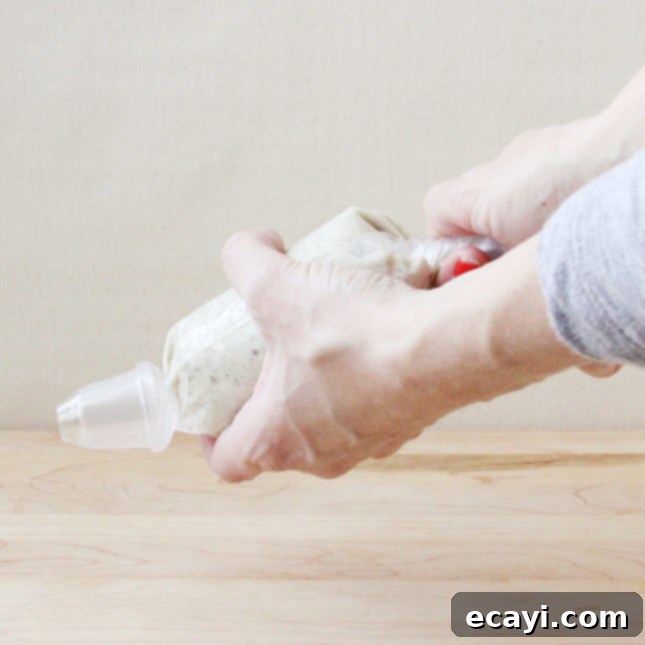
Once the batter is in, remove the pastry bag from the cup, ensuring the tip remains folded or twisted to prevent any batter from escaping. Unfold the larger end of the bag and twist it shut, close to the batter, to create pressure and push the batter down. As you pipe the macarons onto the lined baking sheets, you will maintain this twisting motion (using one hand to twist the top of the bag) to apply constant, even pressure on the batter, ensuring a smooth and consistent flow.
Here’s the technique for piping perfectly round French macaron shells: Hold the pastry bag upright, positioning the tip very close to the parchment paper. Use one hand towards the tip of the pastry bag to guide it, and your other hand to twist the larger end of the bag, pushing the batter down and out. Apply steady, even pressure to form uniform 1 to 1.5-inch disks. You can pipe your macarons relatively close together, as they will not spread significantly during baking. Once enough batter has been extruded, stop twisting the bag and swiftly lift the tip straight up to cleanly break the flow of batter. Finding the correct rhythm and pressure for this process takes practice: you will need several attempts to master this technique. Mastering consistent piping will ensure your macarons are uniform in size and perfectly round.
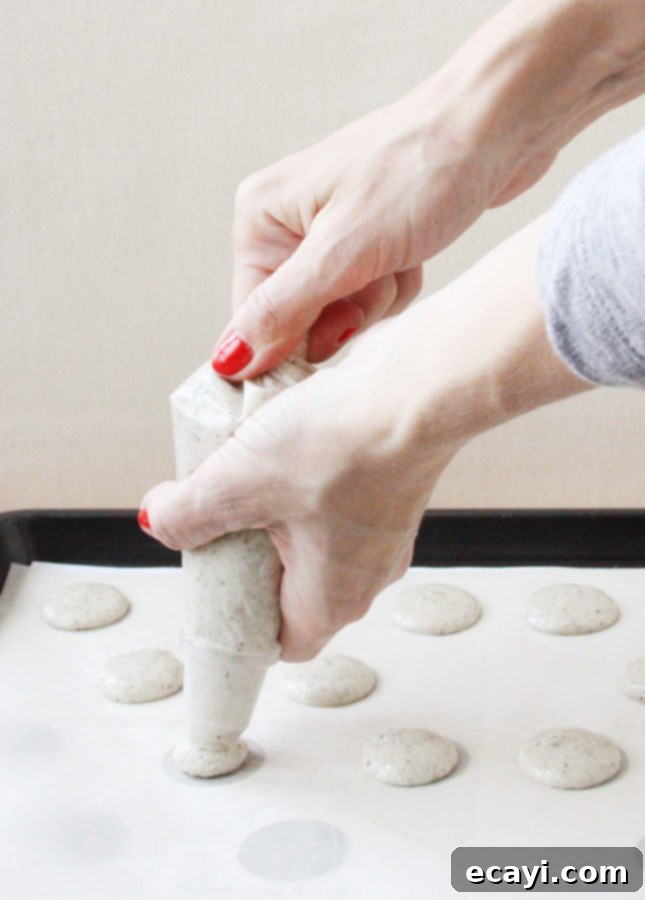
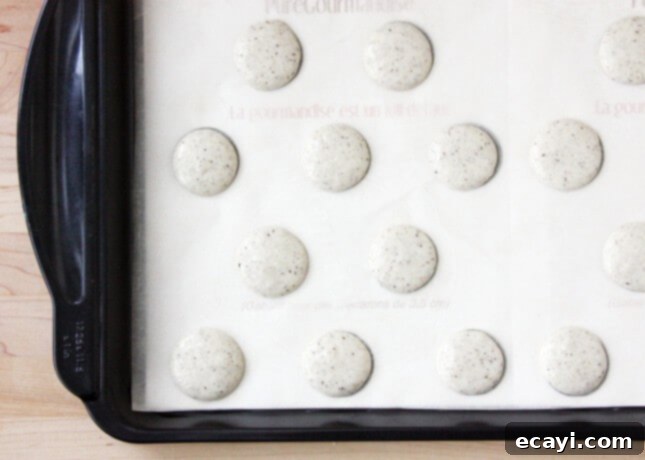
Immediately after piping, your French macarons might have a small pointy tip, resembling miniature Hershey’s Kisses. There’s no need to worry: as the macaron shells rest before baking, these tips should naturally settle and smooth out. If they do not, it might indicate that your macaron batter was slightly too stiff. While you can’t alter the batter’s texture at this stage, you can still achieve smooth tops: firmly bang each baking sheet against your countertop several times. This action helps to even out the caps and releases any trapped air bubbles within the batter.
If any tiny points still persist, you can very gently smooth them out with a small silicone spatula or an offset spatula. This step is entirely optional; a slight imperfection can often add to the charming homemade appeal of your macarons.
STEP 8: RESTING (Developing the “Skin”)
The next step is a test of your patience: you must allow the piped, unbaked macarons to rest undisturbed at room temperature for a minimum of 20 minutes. This crucial resting period, often called “curing,” allows a thin “skin” or “pellicle” to form on the surface of the macaron shells. This skin is essential for proper macaron development during baking; it helps the caps rise beautifully and prevents them from cracking, while simultaneously encouraging the formation of those characteristic ruffled “feet.”
STEP 9: BAKING THE MACARON SHELLS
Approximately halfway through the resting period, preheat your oven to a temperature between 275°F and 300°F (135-150°C). It is imperative to understand that every single oven performs differently; therefore, I highly recommend using an internal oven thermometer to accurately monitor the actual temperature inside your specific oven. Many ovens can be off by as much as 25°F, which is a significant deviation that can easily ruin an entire batch of macarons.
In my electric oven, 275°F (135°C) is the temperature that consistently yields the best results. However, this temperature might be slightly too high for very light-colored macarons, which you typically want to prevent from browning at all. When in doubt, always err on the side of caution: bake your macarons at a slightly lower temperature and extend the baking time as needed. To pinpoint the ideal temperature for your oven, you will need to conduct a few test batches and observe the macarons very closely as they bake. Remember, baking macarons is a nuanced art.
The vanilla bean macarons pictured below were baked at 275°F (135°C) for 14 minutes. The average baking time typically ranges between 13 and 18 minutes. Begin closely monitoring your macarons starting around the 12-minute mark, and avoid opening the oven door before then to prevent temperature fluctuations. The macarons are fully baked when they appear dry and matte, and their “crown” (top shell) feels firm when gently tapped.
Overbaking the macarons will result in an overly crunchy and brittle texture throughout the shell, losing the desired delicate chewiness.
Underbaking them will cause them to have a “wet” or soft appearance as they cool. Underbaked macaron shells will also be exceptionally difficult to remove from the parchment paper; they may stick stubbornly and separate when you attempt to lift them off the sheets, leaving the tender insides behind. Indeed, achieving the perfect bake is a delicate balance!
After a few attempts, you will become more familiar with your oven’s quirks and better at discerning when your macarons are perfectly done. Regardless, prioritize caution when setting your oven temperature. Excessive heat is the macaron’s greatest adversary: it will cause them to cook too rapidly, leading to cracking (much like meringue), undesirable browning, and a loss of their beautiful, vibrant color.
STEP 10: LETTING THE MACARON SHELLS COOL
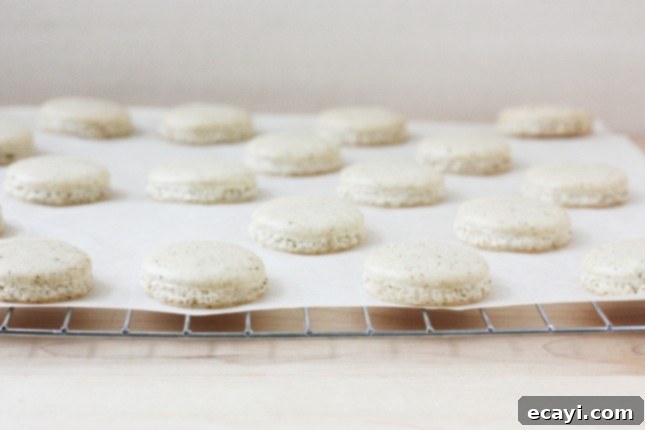
Once your macaron shells are perfectly baked, carefully remove the baking sheets from the oven. Allow the shells to cool completely on the parchment paper, ideally over a wire rack. This allows for air circulation and prevents condensation.
If you need to reuse your baking sheets for subsequent batches, let the shells cool for 5-10 minutes on the hot baking sheet, then gently lift the entire piece of parchment paper, with the macarons still attached, and transfer it directly onto a cooling rack to continue cooling.
Once the macaron shells have cooled entirely to room temperature, they are ready for the exciting step of assembly.
STEP 11: ASSEMBLING THE FRENCH MACARONS
If you prepared your chosen filling in advance, remember to take it out of the refrigerator and allow it to come to room temperature at least 1 hour before you plan to assemble the macarons. This ensures the filling is soft and pipeable/spreadable.
When French macaron shells are perfectly cooked and completely cooled, they should lift effortlessly from the parchment paper. They should have a flat, smooth bottom and a beautifully puffy, intact crown with pronounced “feet.”
If you find your macaron shells are sticking to the parchment paper, don’t despair! Here are two effective tips to help you lift them without causing damage:
- Gently slide a thin offset spatula beneath each individual shell to carefully pry and lift them up. Work slowly and patiently.
- Alternatively, place the entire baking sheet with the stubbornly sticking shells into the freezer for 10 to 20 minutes. This will slightly harden the shells, which should allow them to slide right off the parchment paper with ease!
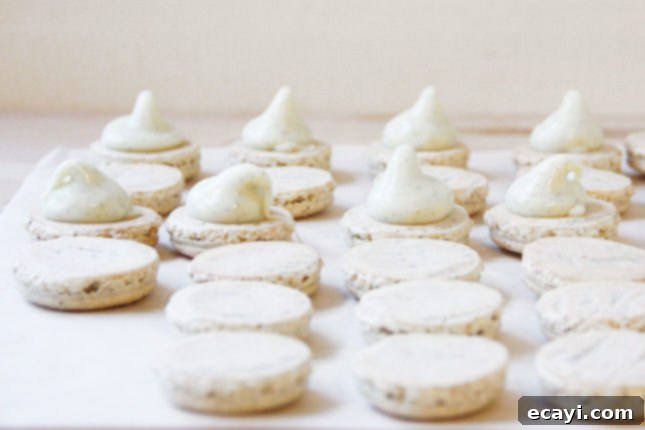
Carefully match macaron shells that are similar in size and shape together. Arrange these pairs side by side, flat side up, either on your baking sheet or a clean working surface. This organization will streamline the assembly process.
Transfer your filling to a pastry bag fitted with a large round tip. If you don’t have a pastry bag, or prefer a simpler method, you can also use a small offset spatula or a knife to spread the filling onto the shells.
Pipe a generous dollop of frosting onto one shell of each matched pair, or delicately hold one shell in your hand, flat side up, and spread a consistent amount of filling over it. Gently place the second matching shell on top of the filling and press lightly to help the filling spread to the edges and seal the macarons.
STEP 12: THE WAITING GAME (Maturation)
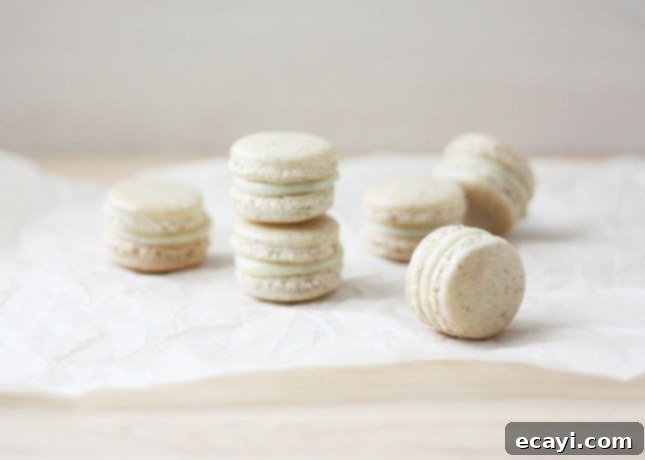
Once all your macarons are beautifully assembled, there’s one final, crucial step: you need to place them in an airtight container, store them in the refrigerator, and allow them to rest for a minimum of 24 hours, or at least overnight. That’s right! After all your diligent hard work, you still can’t immediately savor your creations! Well, you *can* taste one for a sneak preview—macarons certainly won’t be “bad” if you eat them right away. However, allowing French macarons to rest with their filling is the essential final step that fully unlocks their irresistible, signature texture. During this maturation period, the humidity from the filling gradually permeates the crunchy meringue caps. This process is what creates that exquisite, sought-after contrast between the lightly crisp outer shell and the wonderfully tender, chewy interior. Be patient; trust me, the wait is absolutely worth it.
The excellent news about this mandatory waiting period is that it means French macarons can, and ideally should, be made in advance. Your macarons will be at their absolute best if consumed within the next 2 to 3 days after maturation. Always remember to bring them back to room temperature for 30 minutes to 1 hour before serving to fully appreciate their texture and flavor.
STEP 13: ENJOY!
Finally, savor the sweet fruit of your labor! Relish the moment, then start planning your next batch, and continue practicing your skills. With each attempt, your macarons will only keep getting better and more consistently perfect!
Yes, French macarons are finicky. Yes, they demand significant patience and precision to make. And yes, you are quite likely to experience failures at first—even after 15 years of dedicated home macaron baking, I still have occasional batches that don’t turn out perfectly! But the challenge is immensely rewarding, and biting into your very first perfectly homemade macaron is an incredibly satisfying experience. There’s nothing quite like it. Plus, successfully making French macarons at home is considerably less expensive than purchasing a plane ticket to Paris to indulge in them!
Can You Freeze French Macarons?
Absolutely! French macarons are surprisingly freezer-friendly and withstand freezing exceptionally well. To preserve their freshness, store assembled macarons in an airtight container, then place them in the freezer for up to one month. Freezing allows you the convenience of taking out only the exact quantity you need, keeping the rest at their peak freshness. To serve, simply remove the desired number of macarons from the freezer and let them thaw at room temperature for about an hour; they will then be perfectly ready to enjoy.
It’s important to note that freezing works best with creamy, stable fillings such as buttercreams and ganaches. Fillings that are more liquid or contain higher moisture content, such as many types of jams or fruit curds, can excessively moisten the delicate shells, causing them to lose their characteristic crunch completely upon thawing. If you plan to fill your macarons with a jam-based filling, your best approach is to freeze the unfilled shells alone. Then, defrost the shells and assemble them with your fresh jam filling on the very day you intend to serve them for optimal texture.
Should I Throw Away Failed Macaron Shells?
A resounding NEVER throw away failed macaron shells! It’s a common experience that your macaron shells may not always emerge from the oven looking as pristine and perfect as you envisioned—they might be slightly warped, show tiny cracks, or even be a bit hollow. However, unless they are truly burnt to a crisp, they are almost certainly still perfectly usable and delicious. Don’t let aesthetics deter you! Go ahead and fill them with your favorite buttercream or ganache and enjoy them. Alternatively, share them with friends and family; they will undoubtedly be more than happy to indulge in these delightful treats, even if they possess a charmingly “wonky” appearance. Every imperfect macaron is still a labor of love and a delicious reward!
If you continuously encounter persistent trouble making macarons, I highly encourage you to thoroughly read through my very detailed Macaron Troubleshooting Guide: Useful Tips and Advice to Master the French Delicacy. This comprehensive post diligently gathers ALL of the most frequently asked questions and common baking issues I’ve been asked about French macarons over the many years I’ve been sharing this recipe.
Where to Find More French Macaron Recipes
My extensive collection of French macaron recipes is sure to inspire and delight macaron lovers of all levels!
- Milk Chocolate Miso Macarons
- Hazelnut Pear Macarons
- Dark Chocolate Macarons
- Pistachio Macarons
- Milk Chocolate and Passion Fruit Macarons
- Lemon Mascarpone Macarons
- Salted Caramel Macarons
- Fresh Raspberry and Matcha Macarons
- Honey Orange Macarons
- Maple and Pecan Macarons
- Spiced Pecan Macarons with Caramelized Apple Buttercream
- Strawberry and Rhubarb Macarons
- Clementine Macarons
- Lime and Basil Macarons
- Chocolate-Chestnut Macarons
- Yuzu & Ginger Macarons
Printable French Macaron Template
This convenient PDF file prints two copies, perfectly sized to fit a standard half-sheet pan. Download the printable French macaron template here to ensure uniform macaron sizing.
Printable Basic Recipe for French Macarons: Vanilla Bean Macarons
Pin Recipe
Basic Recipe for French Macarons: Vanilla Bean Macarons
Ingredients
For the vanilla bean buttercream
- 113 g unsalted butter, at room temperature
- 240 g powdered sugar, sifted
- ½ vanilla bean, halved lengthwise, seeds scraped with the back of a knife (or substitute 1 tsp/5 ml pure vanilla extract)
- 1 ml kosher salt, or fine sea salt (omit if using salted butter)
- 15 to 30 ml milk
For the vanilla macaron shells
- 3 large egg whites, separated two days in advance, stored in an open container in the fridge (approximately 3.5 oz/100 g)
- 210 g powdered sugar
- 125 g almond flour
- 5 ml pure vanilla powder (ground vanilla bean powder) (optional, but enhances flavor)
- 30 g granulated sugar
Instructions
-
For the vanilla bean buttercream: In the bowl of a stand mixer fitted with the paddle attachment, or in a large bowl if using a hand mixer, beat the butter on medium speed until it is smooth and creamy. Add the sifted powdered sugar and mix at low speed initially to moisten the sugar and prevent a cloud of dust, then increase the speed to fully incorporate. Add the vanilla bean seeds (or vanilla extract) and salt, then beat at high speed for several minutes until the frosting is light, airy, and fluffy. If the frosting appears a bit stiff or too thick, add milk, one tablespoon (15 ml) at a time, until you achieve your desired, spreadable consistency.
-
If you plan to use the buttercream immediately, transfer it to a pastry bag fitted with a large round tip. If you’ve prepared the vanilla bean buttercream in advance, store it in an airtight container and refrigerate until it’s needed. Remember to bring it back to room temperature before use.
-
For the vanilla macaron shells: *It is crucial that your egg whites are at room temperature. Ensure you return the aged egg whites to room temperature at least an hour before you begin making the macaron shells.*
-
In the bowl of a food processor, combine the powdered sugar and almond flour. Process for 30 seconds to a minute until the mixture is exceptionally fine and thoroughly incorporated. Next, sift the mixture through a fine-mesh strainer into a clean bowl to ensure no lumps or larger bits of almonds remain. Discard any large pieces that don’t pass through the sieve.
-
In the cold, clean bowl of a stand mixer fitted with the whisk attachment, or in a large stainless steel mixing bowl if using a hand mixer, begin whisking the room-temperature egg whites on medium/high speed until they become frothy and slightly bubbly. Gradually add a tablespoon of the granulated sugar while continuing to whisk at medium-low speed. Slowly pour in the remaining granulated sugar over the next minute or two. Increase the speed to medium-high and continue whisking until the egg whites are bright white, glossy, and form stiff peaks that hold their shape when the whisk is lifted.
-
Add the sifted almond flour and powdered sugar mixture (along with vanilla powder, if using) to the prepared egg whites. Using your silicone spatula, gently begin to fold in the dry ingredients using the macaronnage technique: slide your spatula all the way to the bottom of the bowl, then sweep it back up to the top. Perform this folding motion about 6 times to initially incorporate the dry ingredients. Continue folding gently for a total of approximately 14 strokes (this number can vary, so visual cues are key) until no pockets of dry ingredients remain, and the mixture slowly drops from the side of the spatula in a continuous, lazy ribbon-like flow. It’s crucial to start testing for the “ribbon stage” early to avoid overfolding, which can lead to flat macarons.
-
Stack two baking sheets together and line the top sheet with parchment paper. If you’re not using pre-cut parchment paper sheets, cut the parchment paper so it fits precisely over the bottom of the sheet, ensuring it lays completely flat to prevent misshapen macarons. If desired for uniform size, slide macaron templates under the parchment paper.
-
Transfer the prepared macaron batter to a pastry bag fitted with a ½-inch (1.25-cm) round tip. Holding the bag upright, pipe 1 ½-inch (3.8-cm) rounds of batter onto the prepared parchment paper. Space them evenly but relatively close to one another, as the batter will not expand significantly during baking.
-
Carefully slide the macaron templates out from under the parchment paper, if you used them. To release air bubbles and flatten any “nipples,” firmly rap each baking sheet against your countertop several times. Allow the piped shells to rest on the baking sheets at room temperature for 20 to 30 minutes, or until a dry “skin” forms (you should be able to gently touch it without batter sticking to your finger).
-
Preheat your oven to 275°F (135°C) with a rack set in the middle position. Bake each sheet of macaron shells for 15 to 18 minutes. The macarons are done when they have developed their characteristic “feet” and are firm on their crown when you lightly tap on them with the tip of a finger. Baking time can vary significantly by oven, so watch closely.
-
Repeat the steps above (resting and baking) for any remaining macaron shells, ensuring your oven temperature remains consistent for each batch.
-
Allow the baked shells to cool completely to room temperature on their baking sheets before attempting to remove them. This usually takes about an hour. Trying to move them while warm can cause them to break or stick.
-
To assemble the macarons: If you prepared the vanilla bean buttercream in advance and refrigerated it, make sure to bring it back to room temperature for at least 1 hour before you intend to use it. This will ensure it is soft and easy to pipe or spread.
-
Carefully pair shells of similar size together and arrange them flat side up on a clean work surface. Using a small offset spatula or a pastry bag with a round tip, spread a generous amount of vanilla bean buttercream over one half of each paired shell. (If your ganache or buttercream was refrigerated, allow it to warm up to room temperature for at least 30 minutes, or until it’s easily spreadable.) Gently place the second shell on top of the filling and lightly press to close the macarons, allowing the filling to spread just to the edges.
-
STORAGE: Once assembled, place the vanilla bean macarons in an airtight container and refrigerate them for at least one night before indulging. This crucial “maturation” period allows the flavors to meld and the shell to soften slightly, creating the iconic chewy texture.
French macarons will keep well, refrigerated, for up to 3 days. You can also freeze assembled macarons in an airtight container for up to 1 month.
-
SERVING: For the best taste and texture, always bring these exquisite French Macarons back to room temperature 30 minutes to 1 hour before serving. This allows the filling to soften and the shells to achieve their perfect chewiness.
Video
Did you make this?
Tell me how you liked it! Leave a comment or take a picture and tag it with @foodnouveau on Instagram.
Disclosure Notice: This site is a participant in the Amazon Associates Program, an affiliate advertising program designed to provide a means for the site to earn fees by linking to Amazon and affiliated sites.
If you click on an affiliate link, I may earn advertising or referral fees if you make a purchase through such links, at no extra cost to you. This helps me create new content for the blog–so thank you! Learn more about advertising on this site by reading my Disclosure Policy.
