Easy Pastel Checkerboard Cake: A Stunning & Festive Easter Dessert
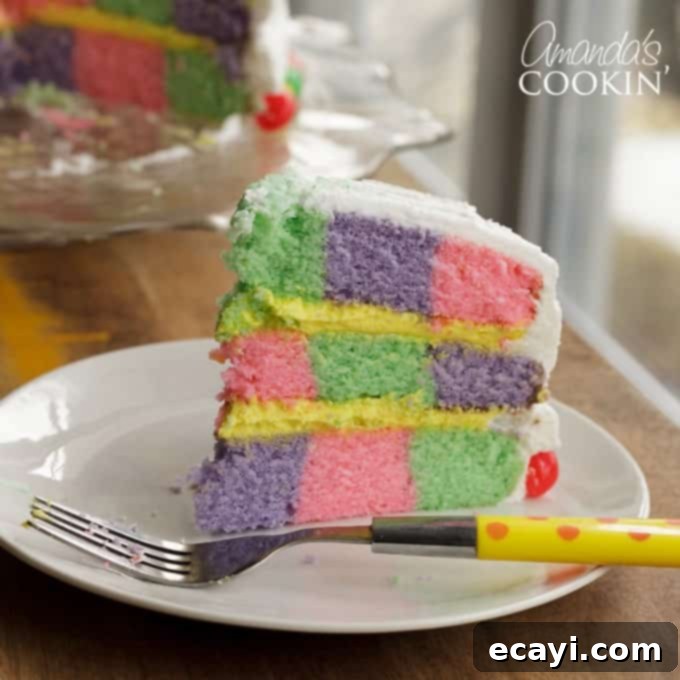
The classic checkerboard cake has always captivated bakers and dessert lovers alike with its visually stunning, contrasting squares of flavor. Traditionally crafted from yellow and chocolate cake, it delivers a delightful surprise with every slice. However, this time, I envisioned something truly unique and vibrant – a cake bursting with soft, delightful hues. With Easter just around the corner, what better occasion to bring this vision to life than by baking a beautiful pastel checkerboard cake?
This recipe isn’t just about creating a gorgeous centerpiece for your holiday table; it’s also incredibly fun to make. Imagine the smiles and gasps of delight as you present this colorful masterpiece to your friends and family. It’s more than just a cake; it’s a celebration in itself, perfectly embodying the fresh, joyful spirit of spring and Easter. Plus, you can easily use any leftover batter from this delightful project to whip up some adorable Easter Bunny Cupcakes, making sure no delicious batter goes to waste!
A Colorful Twist on the Classic Checkerboard Cake for Easter
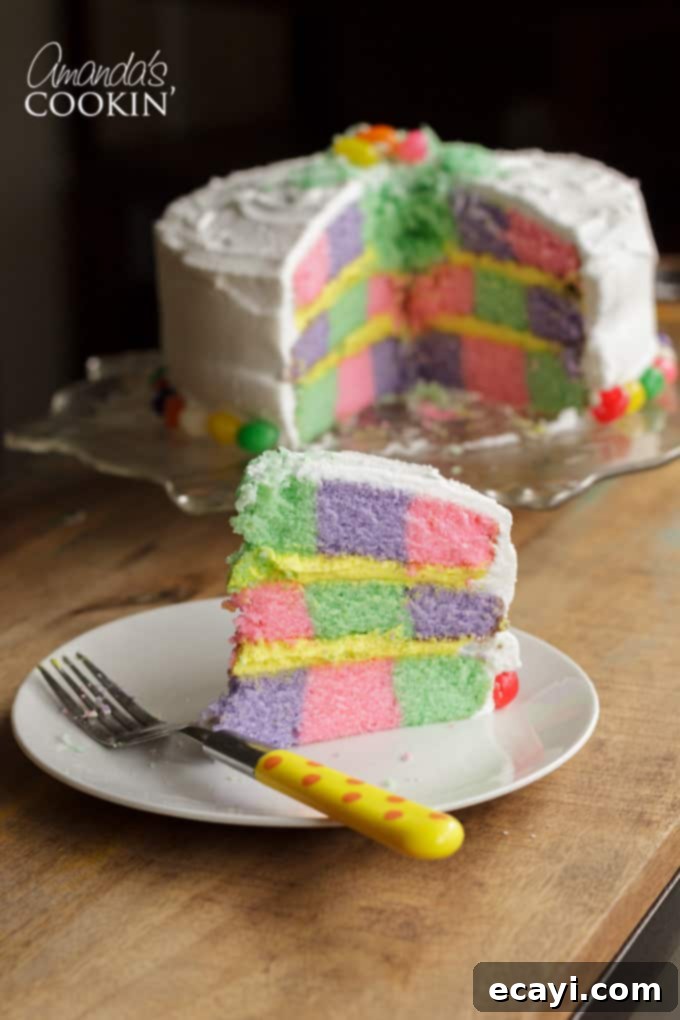
For this delightful and colorful creation, I drew inspiration from Dorie Greenspan’s renowned recipe for Perfect Party Cake, adapting it to achieve the vibrant pastel shades that are so fitting for spring and the Easter season. While traditional checkerboard cakes often feature bold contrasts, my goal was to create something softer, more whimsical, and utterly charming. The base recipe provides a wonderfully tender and flavorful crumb, making it an ideal canvas for our pastel experiment.
Another interesting choice I made for this recipe was opting for a white frosting that uses shortening instead of traditional butter. I know, for some, the idea of shortening in frosting might raise an eyebrow, but trust me on this! This particular frosting yields an incredibly smooth, stable, and perfectly white finish, which is essential when you want your pastel cake layers to truly shine. It creates a crisp backdrop that makes the colored cake stand out beautifully. If you’re hesitant or have a tried-and-true recipe you adore, feel free to substitute with your favorite white icing or buttercream frosting. However, I highly recommend giving this shortening-based frosting a try – its smooth texture and amazing taste truly surprised me!
Baking this cake is a rewarding experience, from mixing the vibrant batters to assembling the distinctive checkerboard pattern. It’s an opportunity to unleash your creativity in the kitchen and craft a dessert that tastes as wonderful as it looks. Whether you’re a seasoned baker or trying a checkerboard cake for the first time, this pastel version offers a delightful challenge and an even more delightful reward. It’s truly a showstopper that will be the talk of your Easter gathering.
Essential Tips for Baking Your Perfect Pastel Checkerboard Cake:
Achieving that stunning checkerboard pattern and a perfectly baked cake requires a few key insights. Here are some detailed baking tips to help ensure your pastel masterpiece turns out flawlessly, along with some practical advice to make the process smoother and more enjoyable:
- Batter Quantity and Utilizing Leftovers: When I first developed this recipe, I initially made one batch of cake batter and found it was a little short for three substantial layers. To ensure you have enough for three generous cake layers and potentially some delightful extras, this recipe is designed as a double batch. You will likely have leftover batter, which is a fantastic opportunity for more treats! I often pour the excess into a 9-inch square pan to make a small marble cake by swirling the different colors, or you could make a dozen adorable cupcakes. These extras are perfect for testing doneness or simply enjoying a quick treat. The instructions below are based on this double batch, so anticipate some delicious surplus!
- Selecting Your White Cake Base: While this recipe provides a fantastic white cake base that yields a tender crumb, don’t hesitate to use your own favorite white cake recipe if you have one. The key is to ensure it produces a light, fluffy texture that can be easily colored and holds its shape well. A good white cake recipe is ideal because it provides a neutral foundation, allowing the delicate pastel food colorings to truly pop without any yellow undertones that might come from a typical yellow cake.
- Managing Mixer Capacity for a Double Batch: This recipe calls for a double batch of batter to create sufficiently thick and impressive layers. It’s important to note that this amount might be quite large for some standard stand mixers. While my KitchenAid handled it well, the bowl was definitely full. If you have a smaller mixer or are concerned about overloading it, you might consider splitting the cake recipe in half and preparing it in two separate batches. This ensures your mixer isn’t overworked and that your batter is thoroughly mixed and properly aerated, leading to a consistently light and fluffy cake texture.
- Effortless Batter Distribution: To make the process of dividing and coloring the batter as smooth and mess-free as possible, I found liquid measuring cups to be incredibly helpful. Their convenient pour spouts allow for precise and clean transfer of the various colored batters into the checkerboard pan inserts. Alternatively, many experienced bakers prefer using decorator bags, which also offer excellent control, especially if you’re aiming for even more precision or if your batter happens to be on the thicker side. Choose the method that feels most comfortable and efficient for your baking style.
- Creative Uses for Leftover Egg Yolks: This recipe primarily utilizes egg whites to achieve that pristine white cake base, which means you’ll be left with several egg yolks. Rather than discarding them, think of them as a bonus ingredient! Egg yolks are fantastic for enriching various desserts and savory dishes. They are particularly perfect for making homemade ice cream, creating rich custards, preparing creamy crème brûlée, or even whisking up a silky hollandaise sauce. It’s a wonderful way to be resourceful and minimize waste in the kitchen.
- Achieving Perfect Pastel Colors: For the most vibrant yet soft pastel shades, always opt for gel or paste food coloring over liquid varieties. Gel colors are highly concentrated, meaning you only need a tiny amount – often less than a pea-sized drop – to achieve rich hues without significantly altering the cake batter’s consistency. Liquid food colorings tend to be much weaker and can thin out your batter if too much is added, potentially impacting the cake’s texture. Start with a very small amount and gradually add more until you reach your desired delicate pastel hue.
- Patience During Cooling: Once your cake layers are baked to perfection, resist the urge to rush the cooling process. This step is crucial for the structural integrity of your cake. Allow the cakes to cool in their pans for approximately 5 minutes before carefully inverting them onto wire racks. This brief cooling period helps the cakes firm up slightly, making them much less prone to breaking or crumbling when unmolded. Ensure they are completely cool to room temperature before attempting to frost them. Frosting warm cakes will inevitably lead to melted frosting and a messy, rather than magnificent, result!
Ingredients You’ll Need for Your Festive Checkerboard Cake:
Gathering all your ingredients beforehand, a practice known as “mise en place,” is crucial for a smooth and stress-free baking process. This recipe calls for fresh, high-quality ingredients to ensure the best flavor and texture for your beautiful pastel cake layers.
- 4 1/2 cups cake flour (Using cake flour, which has a lower protein content, is key for achieving a wonderfully tender and fine crumb in your cake.)
- 2 tablespoon baking powder (This leavening agent provides the necessary lift, making your cake light and airy.)
- 1 teaspoon salt (A touch of salt is vital for balancing the sweetness and enhancing all the other flavors in the cake.)
- 2 1/2 cups buttermilk (Buttermilk adds incredible moisture, a slight tangy note, and reacts with the baking powder to give extra lift, resulting in a super moist cake.)
- 8 large egg whites (Using only egg whites ensures a pure white cake base, allowing your pastel food colors to shine without any yellow interference.)
- 3 cups sugar (Provides sweetness, helps tenderize the cake, and contributes to its moist texture.)
- 4 teaspoons grated lemon zest (The zest, rich in essential oils, infuses the cake with a bright, fresh, and aromatic lemon flavor.)
- 2 sticks (16 tablespoons) unsalted butter, at room temperature (Softened butter is crucial for proper creaming, adding richness and tenderness to the cake.)
- 1 teaspoon pure lemon extract (Enhances the natural lemon zest flavor, giving the cake an extra layer of citrus brightness.)
For the Silky Smooth White Frosting:
This frosting recipe delivers a pristine white color and a delightful, smooth consistency that pairs perfectly with the delicate pastel cake layers. It’s also quite stable, making it ideal for decorating.
- 1 cup vegetable shortening (not butter flavored) (Shortening is used to achieve a brilliant white frosting and provides excellent stability, especially in warmer conditions, preventing the frosting from melting easily.)
- 4 1/2 cups sifted powdered sugar (Sifting the powdered sugar is a crucial step to prevent lumps, ensuring a truly smooth and velvety frosting texture.)
- 4 tablespoons milk (Milk helps to thin the frosting to the perfect consistency for spreading, allowing you to adjust as needed.)
- 1 1/2 teaspoons clear vanilla (Clear vanilla extract provides classic vanilla flavor without adding any unwanted tint to your bright white frosting.)
- 1/2 teaspoon lemon extract (A subtle hint of lemon extract complements the cake’s flavor and adds a refreshing zing to the frosting.)
Helpful Kitchen Tools for Checkerboard Cake Success:
Having the right tools can make all the difference in the baking process, especially when creating a multi-layered, visually intricate cake like this. These items will ensure accuracy, efficiency, and ease as you assemble your stunning checkerboard creation, turning a complex task into an enjoyable one.
- Checkerboard Pan Set (This specialized pan set is truly essential for creating the distinctive, perfectly interlocking checkerboard pattern with minimal effort. It includes the necessary inserts to guide your batter.)
- Stand mixer or hand mixer (A robust mixer is invaluable for thoroughly creaming butter and sugar and ensuring your batter is well-aerated for a light cake. A stand mixer offers hands-free convenience, while a hand mixer provides portability.)
- Mixing bowls (You’ll need several large bowls for whisking dry ingredients, combining wet ingredients, and especially for dividing and coloring your cake batter.)
- Measuring cups and spoons (Accuracy in baking is paramount, so a reliable set of measuring cups and spoons is crucial for precise ingredient measurements.)
- Spatulas and offset spatulas (Spatulas are perfect for scraping down bowls and folding ingredients, while an offset spatula makes spreading batter and frosting smooth and effortless.)
- Wire cooling racks (Essential for allowing your cake layers to cool completely and evenly after baking, preventing sogginess and preparing them for frosting.)
- Parchment paper (Lining your cake pans with round parchment paper ensures easy release of your delicate cake layers, preventing them from sticking.)
- Liquid measuring cups with pour spouts or decorator bags (These tools offer controlled and neat pouring of the colored batters into the pan inserts, minimizing mess and ensuring precise placement.)
- Gel food coloring (As discussed, gel food coloring is superior for achieving vibrant pastel shades without affecting the consistency of your cake batter.)
- Oven thermometer (An inexpensive tool that provides peace of mind, ensuring your oven is truly heating to the correct temperature for consistent baking results.)
Remember, a comprehensive, printable version of this entire recipe, including detailed frosting instructions and ingredient quantities, is conveniently located at the end of this post. It’s designed to be your go-to guide for a seamless baking experience!
Getting Ready: Preparing Your Workspace and Pans for Baking
Before you even start mixing your beautiful pastel cake batter, proper preparation is an absolutely crucial step for any successful baking endeavor, especially with a multi-layered cake. Taking your time with these initial steps will ensure that everything runs smoothly and efficiently once your batter is ready, setting you up for success from the very beginning.
- First, make sure your oven rack is centered to allow for optimal and even heat distribution across all your cake pans. Then, preheat your oven to 350 degrees F (175 degrees C). Consistent oven temperature is absolutely vital for uniformly baked cake layers that rise evenly and cook through perfectly.
- Next, meticulously prepare three 9-inch round cake pans. If you’re utilizing a Checkerboard Pan Set, these pans are specifically designed to accommodate the checkerboard inserts. Generously butter or grease each pan, ensuring full coverage, then line the bottom of each with a perfectly cut round of parchment paper or wax paper. This crucial double-protection step prevents your delicate cake layers from sticking and ensures they release easily and cleanly after baking, preserving their perfect shape.
- Finally, take one of the checkerboard cake inserts from your set and carefully place it securely into one of the prepared pans. Make sure it sits snugly. Set this assembled pan aside, as it will be your starting point for creating the magical checkerboard pattern. Having all your pans thoroughly prepared before you start mixing the batter will prevent any last-minute scrambling and allow you to focus entirely on the delicate process of coloring and layering.
Directions for Creating Your Stunning Pastel Checkerboard Cake:
Follow these detailed, step-by-step instructions carefully to bring your colorful checkerboard cake to life. Precision in mixing and layering is paramount to achieving that impressively intricate internal pattern that will wow everyone when you cut into it.
- Combine Dry Ingredients: In a large mixing bowl, thoroughly whisk together the cake flour, baking powder, and salt. Whisking vigorously for about 30 seconds ensures these dry ingredients are perfectly combined and evenly distributed, which is absolutely essential for consistent leavening and a uniform crumb throughout the cake. Set this bowl aside, ready for later use.
- Prepare Wet Ingredients (Except Butter and Sugar): In a separate, medium-sized bowl, gently whisk together the buttermilk and the egg whites until they are just combined and appear homogeneous. Avoid over-whisking at this stage. This liquid mixture will be gradually added to the creamed butter and sugar later in the process.
- Cream Butter, Sugar, and Zest: In the bowl of your stand mixer (fitted with the paddle attachment) or a very large mixing bowl if you’re using a hand mixer, combine the sugar and the freshly grated lemon zest. Use your clean fingers to rub the zest into the sugar vigorously until the sugar feels moist and releases an intensely fragrant lemon aroma. This technique, known as ‘zesting into sugar,’ extracts the maximum essential oils from the lemon, infusing the sugar with incredible flavor. Add the softened unsalted butter to this fragrant mixture. Beat at medium speed for a full 3 minutes. The goal here is to achieve a very light, fluffy, and pale mixture, indicating that a significant amount of air has been incorporated. This aeration is crucial for contributing to the cake’s tender and light texture.
- Alternate Wet and Dry Additions for Batter: Beat in the pure lemon extract into the creamed butter mixture until just combined. Then, begin adding the whisked dry ingredients and the buttermilk-egg white mixture alternately to the mixer bowl. Start by adding one-third of the flour mixture, beating on medium speed until just incorporated and no dry streaks remain. Next, add half of the milk-egg mixture, beating until homogeneous. Follow this with half of the remaining dry ingredients, mixing until just combined. Add the rest of the milk and eggs, beating until the batter appears smooth and homogeneous. Finally, incorporate the very last of the dry ingredients, mixing just until it disappears. After all ingredients have been added, give the entire batter a good, final 2-minute beating on medium speed. This last aeration step ensures the batter is thoroughly mixed, incredibly light, and fluffy, which is absolutely crucial for a wonderfully tender and springy cake texture.
- Divide and Color the Batter: Evenly separate the prepared cake batter into three separate medium-sized bowls. Now comes the truly fun and creative part: adding the gorgeous pastel colors! Using high-quality paste or gel food coloring (remember, a tiny amount, often smaller than a pea-sized drop, is usually more than sufficient), whisk a different vibrant color into each bowl of white batter. Continue adding very small amounts incrementally until you achieve your desired soft, delicate pastel shades. For a classic Easter palette, I personally used delightful pink, fresh green, and soft purple, but please feel free to choose any complementary colors that inspire you for your own unique creation.
- Layering the First Cake: Take the first prepared cake pan, which should already have the checkerboard insert securely in place. Carefully begin filling the sections: first, fill the center hole halfway with your chosen ‘pink’ batter. Then, proceed to fill the center ring (the next section out from the center) halfway with the ‘green’ batter, and finally, fill the outer ring halfway with the ‘purple’ batter. The key here is to fill each section only halfway to allow ample room for the cake to rise and expand beautifully during baking without overflowing. Once filled, gently loosen the insert’s “legs” from the side of the pan and carefully lift the insert straight up into the air, removing it cleanly. Rinse and thoroughly dry the insert before placing it into the next prepared cake pan, ready for the next layer.
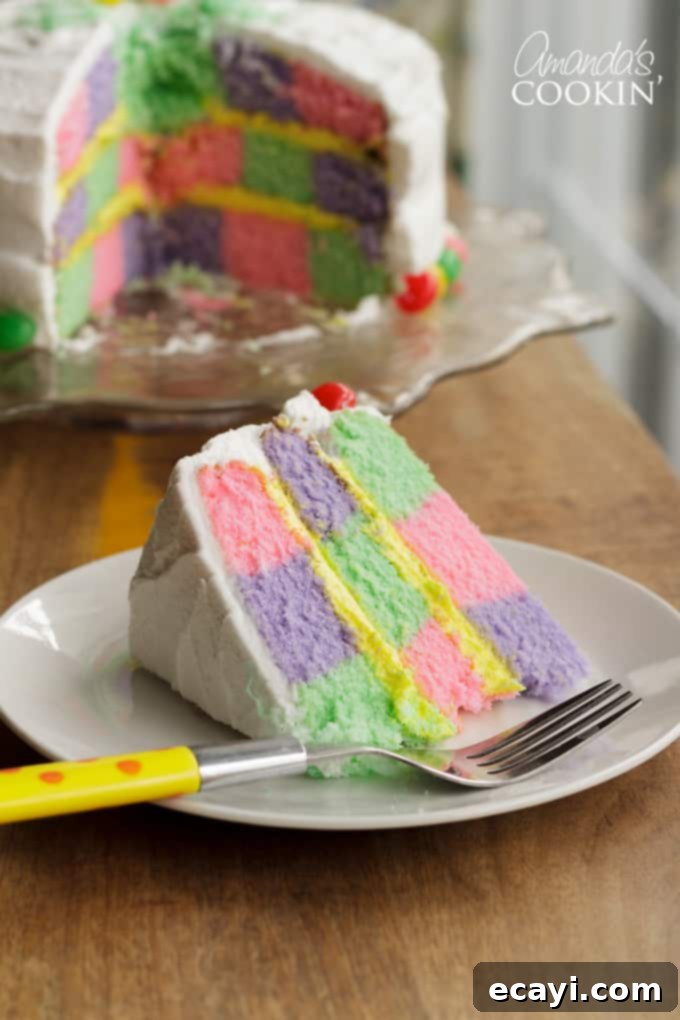
- Layering the Remaining Cakes: For the second cake layer, maintaining the precise alternating pattern is absolutely crucial for creating the distinctive checkerboard effect. If your first cake started with pink in the center, for the second cake, you will fill the center hole halfway with green batter. Then, fill the second ring with purple batter, and the outer ring with pink batter. For the third and final pan, you will continue this fascinating pattern: purple in the center, then pink, then green. This meticulous alternating color placement in each layer is precisely what creates the impressive and surprising checkerboard design when the cake is finally sliced open.
- Bake and Cool Your Layers: Place the filled cake pans into your preheated oven. Bake for approximately 25-35 minutes. Begin checking for doneness after 25 minutes; the cakes should be wonderfully springy to the touch when gently pressed, and a thin knife or wooden skewer inserted into the exact centers should come out completely clean, indicating they are fully baked. Once baked, carefully transfer the hot cakes (still in their pans) to wire cooling racks and allow them to cool in their pans for about 5 minutes. This brief cooling period helps them firm up slightly before unmolding. Then, run a thin knife gently around the inner sides of the cakes to loosen them, carefully unmold them, and gently peel off the parchment paper liners. Invert the cakes and cool them completely to room temperature right-side up on the wire racks. Properly cooled cake layers are absolutely essential for easy, mess-free frosting and assembly. (For added convenience, fully cooled cake layers can be wrapped airtight and stored at room temperature overnight, or even frozen for up splendidly to 2 months, making this a fantastic make-ahead option for busy bakers!)
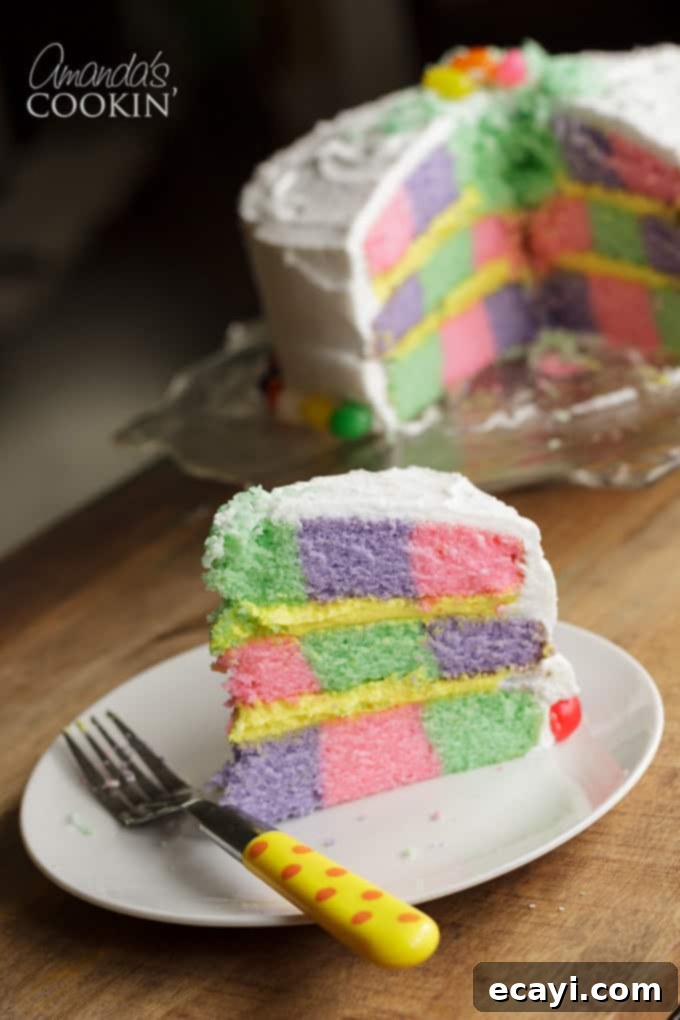
As mentioned, I relied on vibrant paste food coloring to tint the batters and create those gorgeous, soft pastel hues that are perfect for Easter. The distinctive and impressive checkerboard pattern itself was effortlessly achieved using a specialized checkerboard baking set. This set makes the process incredibly straightforward, even for novice bakers. However, if you don’t own this specific pan set or prefer not to purchase one, don’t worry! There are clever and resourceful ways to achieve a very similar, stunning effect without it. This helpful tutorial demonstrates how to make a beautiful checkerboard cake without the specialized pan, using a clever trick with different sized round cutters. This ensures that absolutely everyone can enjoy the joy and satisfaction of making this festive and visually striking cake, regardless of their current kitchen equipment.
Finishing Touches: Frosting and Decorating Your Pastel Masterpiece
Once your beautifully baked and completely cooled pastel cake layers are ready, it’s time to bring everything together with a smooth, delicious frosting. The detailed instructions for preparing this specific white shortening-based frosting, along with step-by-step guidance for assembling the cake and adding its final decorations, can be found in the comprehensive printable version of the recipe provided below. This particular frosting is meticulously designed to perfectly complement the delicate flavors of the cake while providing a pristine, stable canvas for any additional decoration you desire.
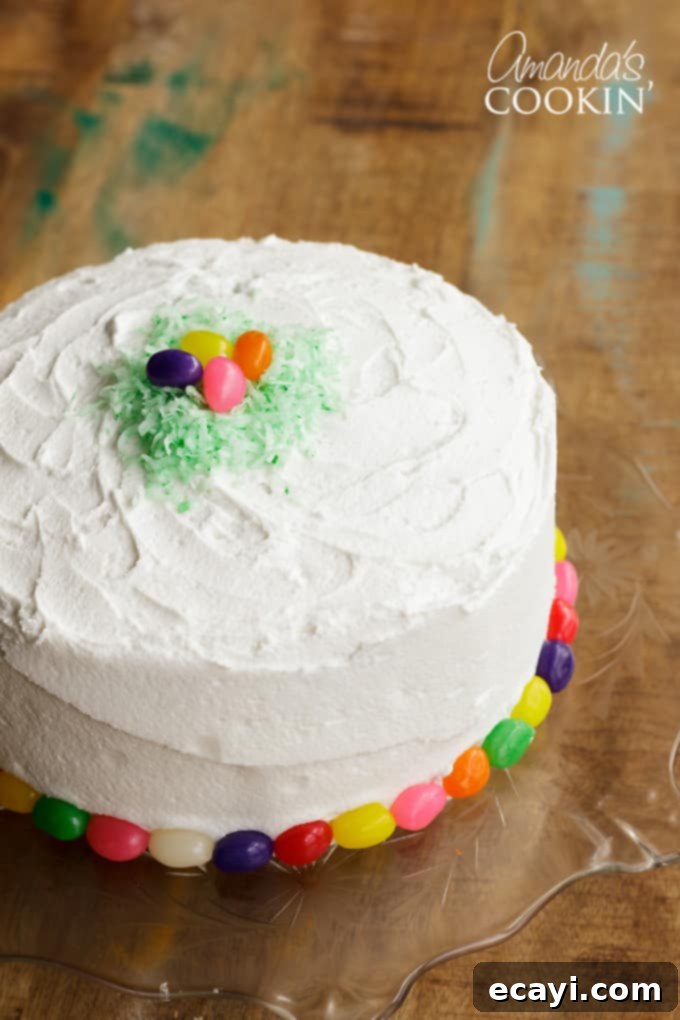
To further enhance the delightful Easter theme and add another layer of visual surprise, consider tinting a small portion of the bright white frosting with a subtle yellow paste food coloring. This yellow frosting can then be artfully used between the cake layers, creating a sunny pop of color that will be revealed when the cake is sliced. The exterior of the cake can remain a pristine white, allowing the intricate pastel checkerboard interior to truly be the star of the show. For a final festive touch that evokes the fresh joy of spring, sprinkle a generous amount of green-tinted shredded coconut on top of the cake to mimic lush spring grass. Then, artfully scatter a few colorful jelly beans or small chocolate eggs to complete the celebratory, whimsical look. Feel free to get creative and personalize your garnishes to match your own Easter style!
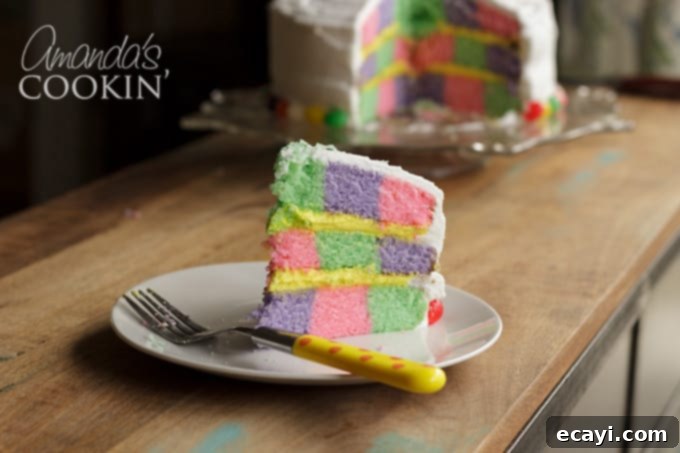
Witnessing the final result of this stunning pastel checkerboard cake is truly breathtaking! The intricate pattern of soft, vibrant colors nestled beautifully within each slice makes every single effort you put into following this recipe completely worthwhile. It’s more than just a dessert; it’s a magnificent, show-stopping creation that is guaranteed to impress your friends and family, leaving them utterly amazed and wondering how you achieved such a magical, edible work of art. The joy of cutting into it and revealing those perfect squares is unparalleled. I truly hope you have an absolute blast making, decorating, and, most importantly, sharing this spectacular Pastel Checkerboard Cake. It’s a sweet, joyful, and unforgettable way to celebrate the holiday and create lasting memories!
Looking for More Delightful Easter Treats and Springtime Desserts?
Easter is a wonderful time for sweet celebrations, and we have a treasure trove of recipes designed to make your holiday table extra special and utterly delicious. If you loved the creative process and the delicious outcome of making this checkerboard cake, you’ll surely enjoy exploring our other festive and seasonally appropriate creations:
- For a taste that immediately reminds you of beloved childhood favorites, you must try our colorful Frosted Sugar Cookie Bars. They boast that same incredibly soft, melt-in-your-mouth, cake-like texture and sweet, creamy frosting reminiscent of classic Lofthouse cookies. They’re quick to make and disappear even faster!
- Don’t miss out on these utterly adorable Rice Krispie Nests. They are a fantastic, quick, and satisfying no-bake treat that’s perfect for involving little hands in the kitchen. Shaped like tiny bird nests, they look charming and are a delight when filled with mini chocolate eggs or jelly beans.
- If you’re a devout fan of the comforting and classic carrot cake, our elegant Carrot Cake Trifle is an absolute must-try. This dessert features luscious layers of moist, spiced carrot cake, rich and creamy filling, and fluffy whipped topping, making it a sophisticated, visually appealing, and incredibly delicious Easter dessert option that’s sure to be a crowd-pleaser.
- We genuinely have far too many amazing and inspiring recipes to list them all here, so be sure to explore our complete and ever-growing collection of Easter recipe ideas for even more fantastic inspiration for your holiday feast, spring gatherings, or any sweet occasion!
Checkerboard Cake for Easter
IMPORTANT – There are often Frequently Asked Questions within the blog post that you may find helpful. Simply scroll back up to read them!
Print It
Pin It
Rate It
Save ItSaved!
Ingredients
Ingredients:
- 4 ½ cups cake flour
- 2 tablespoons baking powder
- 1 teaspoon salt
- 2 ½ cups buttermilk
- 8 large egg whites
- 3 cups sugar
- 4 teaspoons grated lemon zest
- 16 tbsp unsalted butter 2 sticks, at room temperature
- 1 teaspoon pure lemon extract
White Frosting:
- 1 cup vegetable shortening not butter flavored
- 4 ½ cups powdered sugar sifted
- 4 tablespoons milk
- 1 ½ teaspoons clear vanilla
- ½ teaspoon lemon extract
Garnish:
- 1 cup Jelly beans
- ½ cup shredded coconut
- 1 drop green food coloring
Before You Begin
Instructions
-
Preheat oven to 350 F.
-
Butter three 9 inch round cake pans (these come in the Checkerboard Pan Set) and line the bottom of each with a round of parchment paper. Place the checkerboard cake insert into one of the pans and set aside.
Making the Cake:
-
In a large bowl, whisk together the flour, baking powder, and salt.
-
In a separate bowl, whisk together the buttermilk and egg whites.
-
Put the sugar and lemon zest into your mixer’s bowl or another large bowl and rub them together with your fingers until the sugar is moist and fragrant. Add the butter, and working with the paddle attachment, or with a hand mixer, beat at medium speed for a full 3 minutes, until the butter and sugar are very light.
-
Beat in the extract, then add one-third of the flour mixture, still beating on medium speed. Beat in half of the milk-egg mixture, then beat in half of the remaining dry ingredients until incorporated. Add the rest of the milk and eggs, beating until the batter is homogeneous, then add the last of the dry ingredients. Finally, give the batter a good 2-minute beating to ensure that it is thoroughly mixed and well aerated.
-
Separate the batter evenly into three separate bowls. To add paste food coloring, take a small amount (smaller than a pea, it doesn’t take much!) and whisk it into the white batter. Repeat for the other two batches. I used pink, purple, and green.
-
Starting with the pan that has the checkerboard insert, fill the center hole halfway with pink batter. Fill the center ring halfway with green and the outer ring halfway with purple. Carefully loosen the insert’s “legs” from the side of the pan and lift the insert straight up into the air. Rinse and dry the insert and place it into the next pan.
-
In keeping with your pattern flow (pink, green, purple, etc) fill the center hole halfway with green, the second ring with purple, and the outer ring with pink. For the last pan, continuing the pattern, purple in the center, then pink, then green.
-
Bake for 25-35 minutes, checking after 25, or until the cakes are springy to the touch- a thin knife inserted into the centers should come out clean. Transfer the cakes to cooling racks and cool for about 5 minutes, then run a knife around the sides of the cakes, unmold them and peel off the paper liners. Invert and cool to room temperature right side up. (The cooled cake layers can be wrapped airtight and stored at room temperature overnight or frozen for up to 2 months.)
To Make the Frosting:
-
Beat shortening and extracts until creamy, about 1-2 minutes on medium speed. Slowly add 2 cups of the powdered sugar, then 2 tablespoons of milk, 2 more cups of powdered sugar, then the remaining milk and any additional powdered sugar that may be needed.
-
Put 1/3 of the frosting into a separate bowl and tint it with a small amount of yellow paste food coloring. Frost in between the layers yellow and the sides and top of cake white.
- Mix coconut with one drop of green food coloring. Place tinted coconut on top of the cake and add a few jelly beans. Decorate the outside bottom edge of the cake with jelly beans.
Nutrition
The recipes on this blog are tested with a conventional gas oven and gas stovetop. It’s important to note that some ovens, especially as they age, can cook and bake inconsistently. Using an inexpensive oven thermometer can assure you that your oven is truly heating to the proper temperature. If you use a toaster oven or countertop oven, please keep in mind that they may not distribute heat the same as a conventional full sized oven and you may need to adjust your cooking/baking times. In the case of recipes made with a pressure cooker, air fryer, slow cooker, or other appliance, a link to the appliances we use is listed within each respective recipe. For baking recipes where measurements are given by weight, please note that results may not be the same if cups are used instead, and we can’t guarantee success with that method.
This post was originally published on March 23, 2010, and has been updated with new tips and details to enhance your baking experience.
