Achieve Perfectly Crispy Baked Chicken Wings Every Time: Your Go-To Recipe

Craving intensely crispy chicken wings without the hassle and mess of deep frying? You’re in for a treat! We’ve discovered the ultimate secret to achieving perfectly golden, delightfully crunchy baked chicken wings that are tender and juicy on the inside. Forget about greasy, soggy wings – this revolutionary oven-baked chicken wing recipe promises a restaurant-quality experience right in your own kitchen.
For too long, the idea of truly crispy wings seemed exclusive to a deep fryer. But what if we told you it’s possible to enjoy healthier, equally delicious, and incredibly satisfying wings straight from your oven? The magic lies in a simple, yet often overlooked, technique: parboiling. By taking this crucial first step, you’ll render off excess fat, ensuring that when your wings hit the oven, they crisp up beautifully without becoming drenched in their own grease. The result? A lighter, cleaner, and undeniably crispier baked wing that will impress everyone at your table.
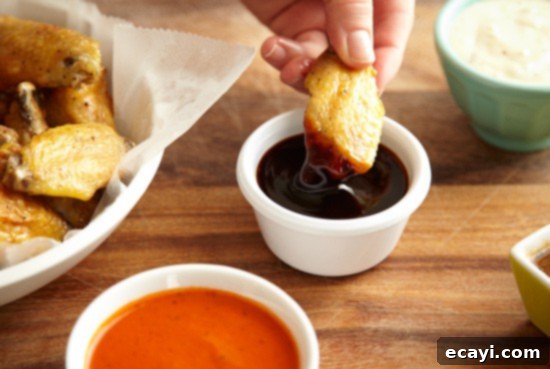
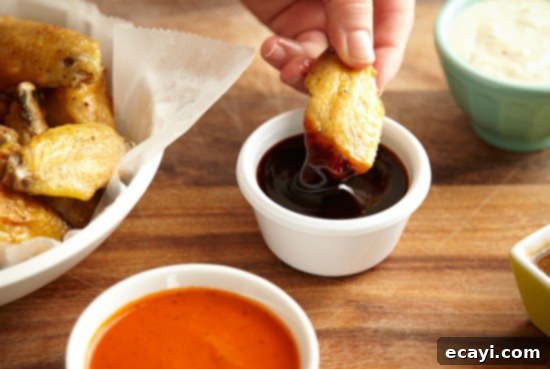
Whether you’re planning a game-day feast, a casual family dinner, or simply looking for an irresistible snack, these crispy baked chicken wings are guaranteed to be a crowd-pleaser. Not only are they incredibly easy to make, but they also offer a fantastic canvas for a variety of flavors. Serve them plain with a sprinkle of salt and pepper, or explore the exciting world of homemade dipping sauces. We’ve included five mouth-watering sauce recipes that will elevate your wing experience from great to absolutely unforgettable. Get ready to transform your chicken wing game forever!
Why Choose Baked Over Fried Chicken Wings?
When it comes to enjoying delicious chicken wings, many automatically think of deep frying. However, there are numerous compelling reasons to opt for oven-baked wings, especially with our proven method. First and foremost, baking offers a significantly healthier alternative. Frying drenches food in oil, leading to a much higher fat and calorie count. Our parboiling and baking technique effectively reduces the overall fat content, making these wings a more guilt-free indulgence.
Beyond health benefits, consider the convenience and clean-up. Deep frying can be a messy affair, often involving splattering oil and the daunting task of oil disposal. Baking, on the other hand, is much cleaner and simpler. You won’t have to deal with large quantities of hot oil or lingering fried food odors in your home. This recipe simplifies the process, allowing you to enjoy fantastic results with minimal fuss and a much easier clean-up, letting you spend more time enjoying your meal and less time scrubbing your kitchen.
The Secret to Unbeatable Crispiness: The Parboiling Method
The true genius behind these incredibly crispy baked chicken wings lies in a technique called parboiling. If you’ve ever wondered how to get oven wings truly crunchy without resorting to unhealthy frying, this is it! Parboiling simply means partially boiling the chicken wings before baking them. This step might seem counterintuitive at first – adding moisture to something you want crispy – but it’s precisely what makes all the difference.
Here’s how it works: Chicken wings, especially the skin, contain a significant amount of fat. When you parboil the wings for 6-7 minutes, the hot water effectively renders out a substantial portion of this excess fat. Think of it as a pre-rendering process. If you were to bake raw wings straight away, this fat would melt in the oven and essentially “fry” the wings in their own grease, preventing the skin from ever getting truly crisp. By removing this fat beforehand, the wing skin is free to dry out and become wonderfully crunchy when exposed to the high heat of the oven. This initial boiling also kick-starts the cooking process, ensuring the wings are fully cooked and tender on the inside by the time the exterior is perfectly crisp. It’s a simple step that yields dramatically superior results, elevating your homemade baked wings to a professional level.
Choosing the Best Chicken Wings
Starting with quality ingredients is always key to a delicious meal. For this recipe, look for fresh, plump chicken wings. They typically come in two main sections: drumettes (mini drumsticks) and flats (the middle section with two bones). Some packages might contain whole wings, which you’ll need to separate at the joint. While fresh wings are ideal for texture, frozen wings can also work. If using frozen, ensure they are fully thawed and patted thoroughly dry before proceeding with the parboiling step. This ensures an even cook and optimal crisping. When purchasing, check the expiration date and look for wings that are free from discoloration and have a healthy pink color.
More Chicken Recipes You’ll Love
Looking for more chicken inspiration? Here are some other fantastic recipes to try:
- Spicy Sticky Wings
- Spicy Oven Fried Chicken
- Air Fryer Fried Chicken
- Air Fryer Chicken Thighs
- Baked Chicken Legs
- Korean Fried Chicken

Crispy Baked Chicken Wings
IMPORTANT – There are often Frequently Asked Questions within the blog post that you may find helpful. Simply scroll back up to read them!
Print It
Pin It
Rate It
Save ItSaved!
Ingredients
- 2 lbs chicken wings
- 1 teaspoon salt
- ½ teaspoon pepper
- ½ teaspoon garlic powder
Before You Begin: Elevate Your Wings with These Incredible Dipping Sauces!
Enhance your crispy baked chicken wings by serving them with a variety of dipping sauces on the side. For those who prefer fully coated wings, simply toss them in your favorite sauce immediately after they come out of the oven, while they are still hot, to ensure maximum adherence and flavor. Here are five fantastic options:
Classic Buffalo Sauce – A tangy and spicy favorite. Combine a 12-ounce bottle of your favorite hot sauce (such as Frank’s RedHot), 1 stick of unsalted butter (melted), 2 teaspoons of honey for a touch of sweetness, and a pinch or two of garlic powder for depth. Whisk together until all ingredients are well combined and smooth. This sauce is perfect for adding that classic, fiery kick.
Creamy Bleu Cheese Dip – The quintessential accompaniment to Buffalo wings. In the bowl of a food processor, combine 1 cup sour cream, 1/2 cup heavy cream, 16 ounces crumbled good quality bleu cheese, 2 teaspoons hot red pepper sauce (like Tabasco), 1 teaspoon Worcestershire sauce for umami, and 1 teaspoon salt. Process all ingredients until smooth and creamy. For a chunkier dip, pulse gently or mix by hand.
Zesty Chili Lime Sauce – A vibrant and fresh option with a bit of a kick. In the bowl of a food processor, combine 2 tablespoons of chopped jalapeño pepper (deseeded for less heat, or left in for more), 1 tablespoon chili sauce, 1/2 cup fresh lime juice, 1/3 cup chicken broth, 2 cloves of garlic, 1 teaspoon of sugar to balance the acidity, 2 tablespoons fresh chopped cilantro, and 1/4 teaspoon of salt. Process until smooth. Transfer the mixture to a small saucepan, heat gently, then allow the mixture to cool completely before serving to let the flavors meld beautifully.
Sweet & Savory Teriyaki Sauce – A delicious glaze that’s perfect for tossing or dipping. In a small saucepan, combine 1 1/2 cloves minced garlic, 4 teaspoons canola oil, 1/2 cup sherry wine (or mirin for a sweeter touch), 1/2 cup low-sodium soy sauce, 2 tablespoons of toasted sesame seeds for nutty flavor, 1/4 cup packed brown sugar, and 1/4 teaspoon red pepper flakes for a hint of heat. Heat the sauce over medium heat. In a separate small bowl, slowly add 1/4 cup cold water to 4 teaspoons cornstarch, whisking until well combined and no lumps remain. Add this cornstarch slurry to the simmering sauce and stir continuously until thickened to your desired consistency.
Exotic Curry Dip – A creamy, aromatic dip that offers a unique flavor profile. In a blender or food processor, combine 2/3 cup plain Greek Yogurt, 1/4 cup mayonnaise, 1 teaspoon each of fresh lemon and lime juice for brightness, 1 1/2 teaspoons curry powder, 3/4 teaspoon fresh minced garlic, and 1 teaspoon honey for sweetness. Process until smooth and well combined. For the best flavor, allow the dip to sit in the refrigerator for at least a couple of hours before serving so that the robust curry flavors can fully meld.
Instructions
-
Prepare the Wings: Begin by cutting off the wing tips. These small tips don’t have enough meat to be eaten, but they are excellent for adding flavor to homemade chicken stock. Use a sharp knife to separate the wings at the joint, creating individual drumettes and flats.
-
Parboil for Crispiness: Bring a large pot of water to a rolling boil. Carefully drop the prepared chicken wings into the boiling water and par-boil them for 6-7 minutes. This critical step helps to cook away some of the excess fat, which is the secret to achieving that coveted crispy baked chicken wing skin. Once parboiled, remove the wings from the pot and place them on a cooling rack set over a baking sheet to allow them to air dry thoroughly.
-
Preheat Oven and Prep Pan: While the wings are drying, preheat your oven to a high temperature of 450°F (232°C). Prepare a rimmed baking sheet by spraying it generously with cooking spray, or line it with parchment paper for easier cleanup.
-
Season the Wings: In a small bowl, mix together the salt, pepper, and garlic powder. If your wings are still moist after air drying, gently pat them completely dry with paper towels – this is key for maximum crispiness. Season the wings generously with the salt mixture, ensuring an even coating. Arrange the seasoned wings in a single layer on your prepared baking sheet, making sure not to overcrowd the pan.
-
Bake to Golden Perfection: Bake the chicken wings for a total of 40 minutes. For even cooking and crisping, remember to turn the wings once halfway through the baking time (around the 20-minute mark). Continue baking until the wings are golden brown, incredibly crispy, and cooked through to an internal temperature of 165°F (74°C). Serve immediately with your favorite dipping sauces!
The recipes on this blog are tested with a conventional gas oven and gas stovetop. It’s important to note that some ovens, especially as they age, can cook and bake inconsistently. Using an inexpensive oven thermometer can assure you that your oven is truly heating to the proper temperature. If you use a toaster oven or countertop oven, please keep in mind that they may not distribute heat the same as a conventional full sized oven and you may need to adjust your cooking/baking times. In the case of recipes made with a pressure cooker, air fryer, slow cooker, or other appliance, a link to the appliances we use is listed within each respective recipe. For baking recipes where measurements are given by weight, please note that results may not be the same if cups are used instead, and we can’t guarantee success with that method.
Tips for Extra Crispy Baked Wings
- Dry, Dry, Dry: After parboiling, it’s crucial to get the wings as dry as possible. Pat them with paper towels and then let them air dry on a rack for at least 15-30 minutes, or even longer in the refrigerator. The drier the skin, the crispier the result.
- High Heat is Key: Don’t be shy with your oven temperature. 450°F (232°C) is ideal for achieving a super crispy skin without overcooking the meat.
- Single Layer Baking: Always arrange wings in a single layer on your baking sheet, ensuring there’s space between each wing. Overcrowding the pan will steam the wings instead of baking them, leading to a less crispy outcome. Use two baking sheets if necessary.
- Baking Rack: For even crispier results, place the wings on a wire rack set inside a rimmed baking sheet. This allows air to circulate around all sides of the wings, preventing a soggy bottom.
- A Touch of Baking Powder (Optional): For an extra boost of crispiness, you can lightly toss the parboiled and dried wings with 1 teaspoon of baking powder (not baking soda) per 2 pounds of wings, along with the salt and pepper. The baking powder helps to raise the skin’s pH, breaking down proteins and promoting a crispier exterior. Make sure it’s aluminum-free baking powder to avoid any metallic taste.
Serving Suggestions: What to Pair with Your Crispy Wings
These crispy baked chicken wings are perfect on their own, but they also shine when paired with the right sides. For a classic pub-style meal, serve them alongside fresh celery sticks and carrot sticks to complement the richness and provide a cooling crunch, especially with spicy sauces. A simple green salad with a light vinaigrette is a great way to add freshness. For a heartier meal, consider serving them with homemade French fries, sweet potato fries, or even a creamy coleslaw. These wings are also fantastic for parties, potlucks, and game-day gatherings – simply arrange them on a large platter with an assortment of dipping sauces for your guests to choose from!
Storing and Reheating Baked Chicken Wings
Leftover crispy baked chicken wings can be stored in an airtight container in the refrigerator for up to 3-4 days. To reheat and bring back some of that amazing crispiness, avoid the microwave. Instead, preheat your oven to 375°F (190°C) and place the wings on a baking sheet. Reheat for about 10-15 minutes, or until thoroughly warmed through and the skin has re-crisped. An air fryer is also an excellent option for reheating, typically taking 5-8 minutes at 350°F (175°C).
Frequently Asked Questions About Baked Chicken Wings
Q: Can I use an air fryer for this recipe?
A: Absolutely! The parboiling step is still highly recommended for air fryer wings to render fat and achieve superior crispiness. After parboiling and drying, air fry at 375°F (190°C) for 20-25 minutes, flipping halfway through, until golden brown and crispy. Cooking times may vary depending on your air fryer model.
Q: Do I really need to parboil the wings?
A: While you technically *can* skip the parboiling step, it is the absolute secret to achieving truly crispy, non-soggy baked wings. Without it, the wings will release too much fat in the oven, preventing the skin from crisping up effectively. We highly recommend not skipping this crucial step for the best results.
Q: Can I prepare the wings ahead of time?
A: Yes! You can parboil the wings, allow them to cool completely, then pat them very dry and store them in an airtight container in the refrigerator for up to 24 hours. When ready to bake, season them and proceed with the baking instructions. This can be a great time-saver for entertaining.
Q: How can I make these wings spicier?
A: There are several ways to kick up the heat! You can add a pinch of cayenne pepper to your dry seasoning mixture. For a spicier sauce, increase the amount of hot sauce in your Buffalo recipe or add extra red pepper flakes to the Teriyaki. You could also create a spicy rub using chili powder, paprika, and a touch of ghost pepper powder for the truly adventurous!
Final Thoughts on Your New Favorite Crispy Baked Chicken Wings
There you have it – the definitive guide to making the most incredibly crispy baked chicken wings you’ve ever tasted! This recipe proves that you don’t need a deep fryer to achieve that coveted crunch and flavor. With just a few simple steps, especially the game-changing parboiling technique, you can enjoy healthier, perfectly cooked wings every single time. So gather your ingredients, pick your favorite dipping sauce (or try all five!), and get ready to impress your family and friends with these sensational, guilt-free crispy baked chicken wings. Happy cooking!
