Ultimate Guide to Fluffy Homemade Croissants: Easy Recipe & Expert Tips
Imagine waking up to the irresistible aroma of freshly baked, perfectly golden croissants. These light, airy, and intensely buttery homemade croissants are not just a dream; they’re an achievable reality. This comprehensive guide provides a detailed recipe, complete with clever tips, step-by-step photos, and clear instructions, making the art of croissant baking approachable for any home baker, from seasoned enthusiasts to curious beginners and even younger culinary apprentices. Say goodbye to store-bought pastries and hello to your new favorite breakfast indulgence!

This post contains affiliate links. Full disclosure is at the bottom of the article.
VIDEO: Watch me make croissants from scratch!
For many of us, croissants are a delightful treat we grab from our favorite bakery without a second thought. The idea of making them at home often feels daunting, a culinary Everest reserved for professional pastry chefs. Yet, homemade croissants have been a long-standing aspiration on my personal baking bucket list. As someone who genuinely enjoys intricate pastry projects, I was driven by curiosity to unravel the secrets behind these flaky marvels. My initial intention was simply to make them once, to understand the process, and then happily return to purchasing them from a shop. However, this long-held dream lingered for years, awaiting the perfect catalyst.
That catalyst arrived in the form of a new cookbook: In the French Kitchen with Kids, authored by the wonderfully talented Mardi Michels. Upon seeing a cookbook designed for busy families and children featuring a genuine croissant recipe, a lightbulb moment occurred. If children could tackle this, surely homemade croissants were entirely within reach for any enthusiastic home baker, right? This revelation instantly propelled the croissant project to the top of my culinary priorities. I meticulously read through Mardi’s recipe multiple times, eager to grasp every nuance before diving headfirst into the task.
What I discovered was truly game-changing: Mardi’s recipe introduces clever shortcuts to simplify the homemade croissant process without compromising on flavor or texture. While you won’t be engaging in the industrial laminating process typically handled by specialized machines in professional pastry shops, you will still master the rhythmic art of rolling, folding, and turning the dough a total of eight times. This repetitive, almost meditative technique is crucial. Through each turn, the initially sticky and incredibly soft dough undergoes a remarkable transformation, becoming beautifully smooth, elastic, and ready to create those iconic layers. There’s an undeniable satisfaction in this methodical process, a feeling that truly makes you feel like a seasoned pastry professional.
Mardi accurately describes that this particular rolling and folding technique yields a “fluffy, rather than super flaky, croissant.” And she is absolutely spot on: these homemade croissants are, without exaggeration, the airiest, butteriest breakfast treat imaginable. Served warm, mere minutes after emerging from the oven, they are nothing short of magical. The sweet, buttery aroma alone transports you to a state of pure culinary bliss. And the best part? They remain incredibly delightful for several days afterward, especially when gently reheated. My family and I have savored them in countless ways: plain, generously dipped in homemade jam, or even sliced open and filled with classic combinations like peanut butter and jelly, or savory ham and cheese.
This fantastic homemade croissant recipe is just one of the many culinary treasures found within Mardi Michels’ inspiring book, In the French Kitchen with Kids. Mardi, a dedicated school teacher, has been passionately leading cooking classes for both children and adults for years. I’ve always admired the exquisite dishes, desserts, and treats that the children in her classes create. There’s something truly enchanting about witnessing little hands meticulously crafting tartlets or expertly rolling croissants. This cookbook is a direct culmination of her extensive experience and profound expertise. Her philosophy is clear: if children can confidently prepare delightful French delicacies such as Profiteroles, Madeleines, and Crème Brûlée, then absolutely anyone can learn to master them.

Mardi’s brilliance as a teacher shines through her writing. She adopts an empathetic, incredibly helpful tone that makes even complex recipes feel accessible. To aid in planning more ambitious culinary adventures, she provides clear timetables. She points out visual cues that help bakers stay on track, ensuring success at every stage. Furthermore, her pages are sprinkled with engaging anecdotes that offer fascinating insights into French cuisine and culture. Mardi is committed to dismantling the misconception that French cooking is overly fancy or too challenging for children. She eloquently champions the vital importance of teaching children how to cook and provides remarkably practical, yet simple, tips for making the cooking experience enjoyable and educational for kids.
Reading Mardi’s book served as a powerful reminder for me to cook and bake more frequently with my own son. Due to my profession, much of my cooking typically happens during the day when he’s at school. For efficiency, I often prepare family meals in advance, simply assembling or reheating them come dinnertime. This schedule meant that while my son knew I cooked constantly, he rarely got the opportunity to join me in the kitchen. Inspired by Mardi’s approachable methods, I’ve started carving out dedicated time for small baking projects on weekends. These shared moments have become incredibly fun for both of us. So far, we’ve successfully made Mardi’s delectable financiers and charming jam tarts, and we have many more recipes from her book eager to try. As my son grows older and gains more kitchen experience, our projects will naturally become more complex. For now, I am simply overjoyed that In the French Kitchen with Kids reawakened my desire to share my passion for cooking and baking with him.

Helpful Tips for Mastering Homemade Croissants
Planning Your Croissant Baking Schedule
While the actual hands-on time for making homemade croissants is quite manageable, the overall process requires patience due to several crucial resting periods. Here’s a typical timeline to help you plan your baking adventure effectively:
- First Dough Mix: Approximately 15 minutes
- Initial Dough Rest: 1 hour
- Rolling, Folding, and Turning (8 turns): 30 to 45 minutes
- Second Dough Rest: 3 hours (or ideally, overnight in the refrigerator)
- Final Rolling and Croissant Shaping: 30 to 45 minutes
- Third (Proofing) Rest: 3 hours
- Baking Time: 20 to 25 minutes
In total, making these exquisite homemade croissants is about a 9-hour journey, though much of this time is hands-off resting. While it is certainly possible to complete this entire project in a single day—starting in the morning and baking in the late afternoon or early evening—I highly recommend splitting the task over two days. My preferred method involves refrigerating the folded dough overnight for the second rest, or, even better, shaping the croissants and refrigerating them overnight for the third rest (known as proofing). This latter option is truly superior as it allows you to wake up and bake freshly proofed croissants, guaranteeing the ultimate warm, buttery breakfast experience!

Essential Equipment for Croissant Making
To embark on your homemade croissant journey, you’ll need a few key tools to ensure a smooth and successful process:
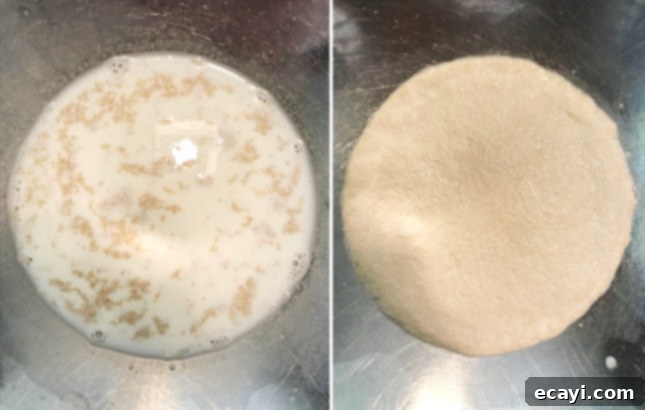
- Digital Thermometer (Optional, but highly recommended): This tool is incredibly useful for precisely monitoring the temperature of your milk in the initial step. The milk must be warm enough (between 110˚F and 113˚F or 43-45˚C) to activate the yeast. If the milk is too hot, it will unfortunately “kill” the yeast, rendering it ineffective, and your dough won’t rise. If it’s too cold, the yeast won’t activate sufficiently. If you don’t have a thermometer, a reliable old-school trick is to test the milk temperature on the inside of your wrist, much like parents used to check baby formula. The milk should feel slightly warmer than your skin. If it feels hot, it’s too hot for the yeast. You’ll know for sure if the temperature was right after letting the milk and yeast mixture rest for 10 minutes: a frothy top indicates properly bloomed yeast. If you see only specks of unbloomed yeast, it’s best to start over to guarantee successful rising.
- Food Processor: A food processor makes quick work of mixing the initial dough ingredients, saving time and effort. If you don’t own a food processor, you can achieve similar results by using a pastry cutter or even your fingertips to cut the butter into the flour, though it will require a bit more arm strength and patience.
- Rolling Pin: Essential for rolling out the dough into large, even rectangles with consistent thickness, which is crucial for creating those beautiful croissant layers. In a pinch, a clean, empty wine bottle can serve as a makeshift rolling pin.
- Pastry Scraper or Large Icing Spatula: When you begin the rolling and folding process, the dough will be quite soft and sticky. These tools are indispensable for gently lifting and manipulating the dough from your work surface without tearing it. A thin metal turner could also work if you don’t have these specific tools.
- Two Baking Sheets and Parchment Paper: You’ll need two parchment-lined baking sheets for resting and baking your shaped croissants. Opt for aluminum baking sheets if possible, as darker sheets can sometimes lead to premature browning of baked goods.
- Ruler or Tape Measure, and Pizza Cutter: These tools are invaluable for accurately cutting the dough into precise rectangles and then triangles for shaping. Ensure your ruler is clean before it touches the dough. A very sharp knife can be used in place of a pizza cutter.
- Pastry Brush: Necessary for applying the egg and cream wash to your croissants just before baking, giving them that beautiful golden sheen.
Baking Homemade Croissants with Children
As Mardi herself points out, this particular recipe for homemade croissants is among the more advanced culinary projects featured in her book. It’s not necessarily difficult from a technical standpoint, nor does it demand highly specialized skills. However, the process is lengthy, involving several resting periods, and requires a good measure of care and patience, especially during the repeated rolling, folding, and turning of the dough. For these reasons, I would generally recommend tackling this recipe with older children, particularly those who already have some prior experience and comfort in the kitchen. Younger children might find the extended waiting times discouraging, although it can certainly serve as an excellent, albeit challenging, lesson in delayed gratification!
Honestly, the sheer length of the croissant-making process could become less enjoyable with a very young child constantly asking, “Are they done yet?” My son, for instance, was only four years old when we first made these. Here’s how I adapted the process to ensure it remained a fun and engaging experience for him. One Saturday afternoon, I began preparing the dough in the kitchen. As he often does, his natural curiosity led him to join me, asking about my activity. I explained, “I’m making dough! Would you like to help?” He eagerly assisted by adding ingredients to the food processor and then helped me gather the sticky dough into a ball. Once his initial enthusiasm waned, he went off to play. After the dough had completed its first rest, I took over the more delicate and strength-demanding tasks of rolling, turning, and folding the dough myself, as these steps require a certain level of precision.
I then allowed the dough to rest overnight in the refrigerator. The following morning, I brought him back into the kitchen. The dough was now ready to be rolled out and cut into triangles. This was the perfect moment for him to help roll the individual croissant shapes, a task he absolutely adored. He was incredibly excited to taste the finished croissants, but I gently explained that they would be ready after lunch. What a treat it was to enjoy freshly baked croissants with jam for dessert that day! My son was immensely proud to have participated in the process, and incredibly impressed that we had baked such delightful croissants from scratch. Knowing his attention span and patience levels, I strategically involved him in the most engaging and age-appropriate parts of the project. And you can be absolutely sure, he was a true professional when it came to eating them!
Ultimately, you know your children best. The key is to divide this larger project into smaller, manageable tasks and involve them in the steps you know they will genuinely enjoy and find rewarding. If they wish to stay and help for a while, encourage it. If their attention drifts and they wander off, let them! There’s no need to force it. The next time you bake, they might just stick around for longer. And with a bit of encouragement and practice, you might find them confidently making homemade croissants all on their own sooner than you think!

GET A PRINTABLE VERSION OF THE RECIPE: Below, I’ll first break down the recipe into detailed, easy-to-follow steps accompanied by helpful pictures. However, if you prefer, you can also quickly jump directly to a printable version of the recipe located at the very bottom of this post.
How to Make Homemade Croissants from Scratch: A Step-by-Step Recipe
VIDEO: Watch me make croissants from scratch!
YIELD: 10 croissants
Active time: 1h15 to 1h45
Resting time: 7 hours, divided into 3 rests
Baking time: 20 to 25 minutes
Ingredients
- 1/2 cup (125 ml) whole milk (3.25 % m.f.) or partly skimmed milk (2% m.f.)
- 2 1/2 tsp (12 ml) active dry yeast
- 1 1/2 cups (375 ml / 225 g) all-purpose flour
- 1/4 cup (60 ml / 50 g) granulated sugar
- 1 cup (250 ml / 226 g) cold salted butter or European-style butter, cut into cubes
- All-purpose flour, for rolling and shaping
- 1 egg, lightly beaten
- 1 tbsp (15 ml) heavy (35% m.f.) cream
Instructions
- Heat the milk to between 110˚F and 113˚F (approx. 45˚C) in a medium saucepan set over medium heat. It’s highly recommended to use a digital thermometer for precise temperature control. Alternatively, you can warm the milk in a microwave: start with 30 seconds on high, then stir and check the temperature, continuing with 10-second bursts if necessary.
- Pour the warmed milk into a large heatproof bowl and evenly sprinkle the active dry yeast over its surface. Allow the mixture to sit undisturbed for 10 minutes. By this time, the yeast should have bloomed, and the surface of the milk will appear frothy.
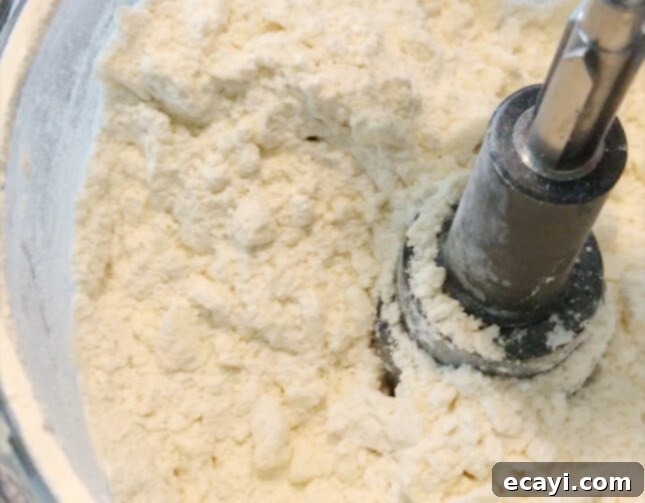
- While the yeast is activating, combine the all-purpose flour, granulated sugar, and cold, cubed butter in the bowl of a food processor fitted with a metal blade. Pulse the mixture eight to ten times. At this stage, it’s important that you can still clearly see distinct, large chunks of butter within the flour mixture; avoid over-processing.
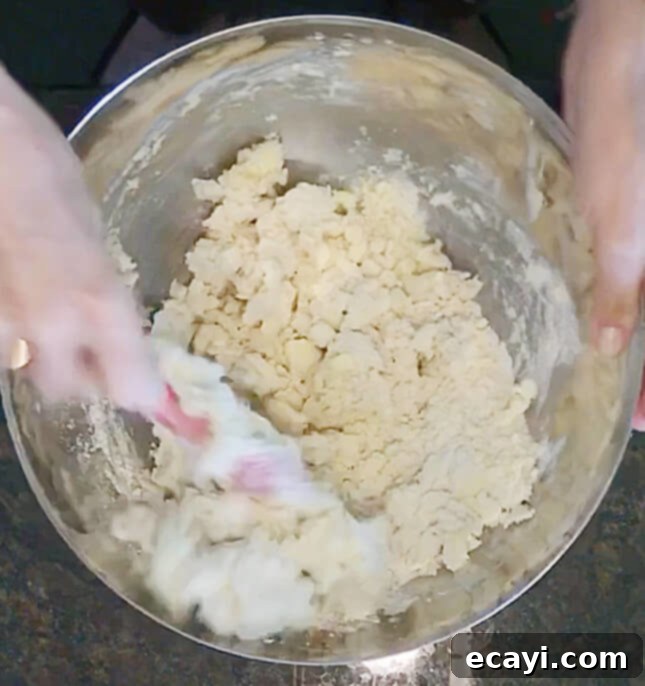
- Carefully transfer the flour and butter mixture from the food processor over the frothy, warmed milk and yeast. Use a wooden spoon to gently incorporate the dry ingredients into the liquid, mixing just until they are combined. The dough will have a lumpy, shaggy appearance and will feel quite dry.
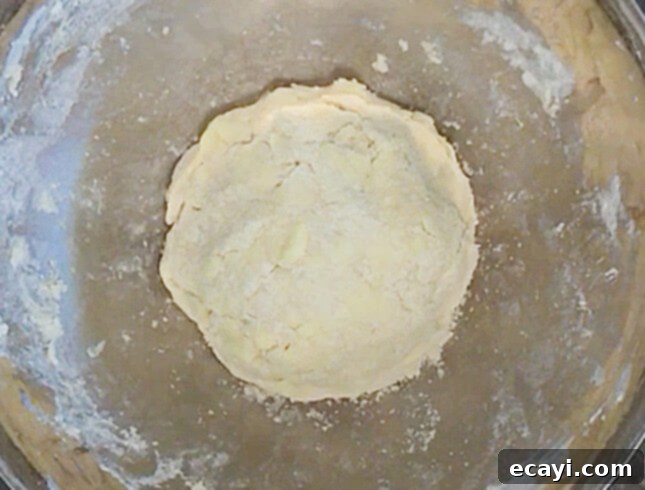
- Using your hands, gather the dough together and form it into a cohesive ball. Tightly cover the bowl with plastic wrap and place it in the refrigerator for approximately 1 hour. It’s important not to leave it much longer than this, as the dough can become too firm and difficult to roll out later.
- Remove the chilled dough from the refrigerator. Lightly flour your clean countertop and transfer the dough onto the work surface. At this stage, the dough will be exceptionally soft and sticky, so you will likely need to sprinkle additional flour on top of the dough to prevent sticking. Gently shape the dough into a rough rectangle.
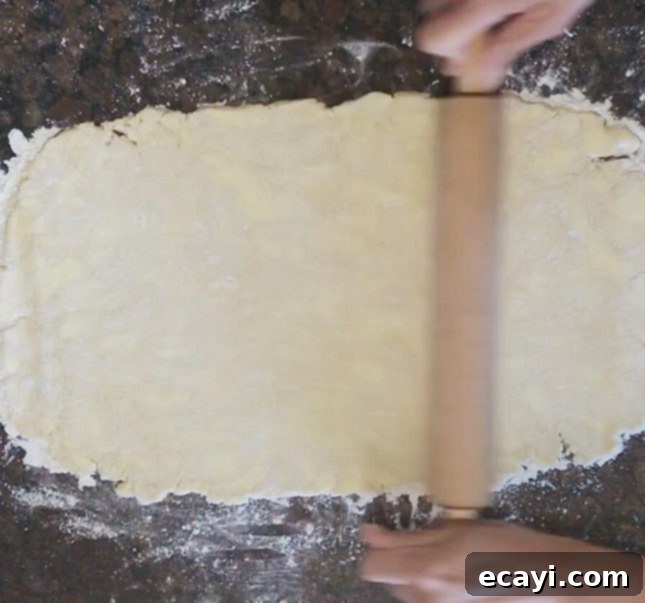
- Lightly flour your rolling pin and begin rolling out the dough until it forms a very large rectangle, approximately 8 x 17 inches (20 x 40 cm). As you roll, you should be able to clearly see visible pieces of butter marbled throughout the dough. If the edges of your rectangle begin to crack slightly, simply press them back together with your fingers and continue rolling until you achieve the desired dimensions.
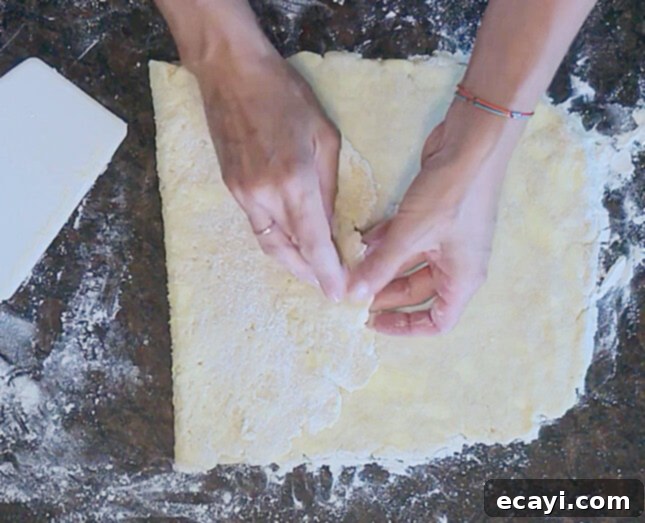
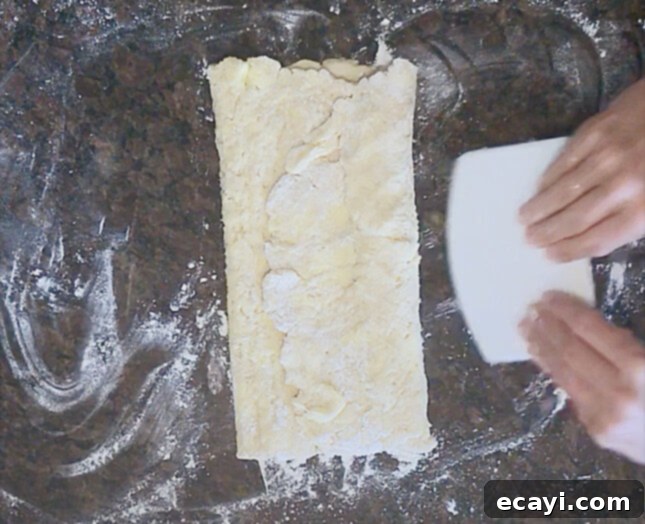
- Orient the largest side of the rectangle towards you. Fold the dough from the left, covering approximately two-thirds of the rectangle, then fold the remaining right-hand third over the first fold. The dough will still be very soft and quite sticky at this point; use a pastry scraper or a large icing spatula to help lift and manipulate the dough more easily. After folding, the short side of the now folded dough rectangle should be facing you. Turn the dough clockwise by a quarter turn so that the long side of the rectangle is once again facing you. (Again, the pastry scraper will likely be helpful here). This complete sequence of rolling, folding, and turning is referred to as a “turn.”
- Lightly flour the working surface around the folded dough and the top of the dough once more. Re-flour your rolling pin lightly. Repeat Steps 7 through 9 a total of seven more times, completing eight “turns” in all. Be diligent about sprinkling flour to prevent the dough from sticking, but use only as much as necessary. With each subsequent roll, fold, and turn, you will notice the dough becoming progressively smoother, more elastic, and significantly easier to handle. This transformation is a rewarding part of the process.
- Upon completing all eight turns, perform one final fold on the dough. Tightly wrap the entire dough parcel in plastic wrap. Refrigerate the dough for a minimum of 3 hours, or ideally, overnight. This crucial resting period allows the butter to firm up and the gluten to relax, which is essential for flaky croissants.
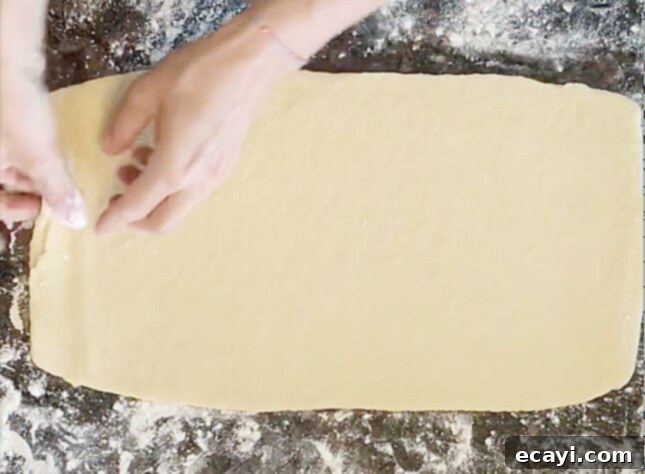
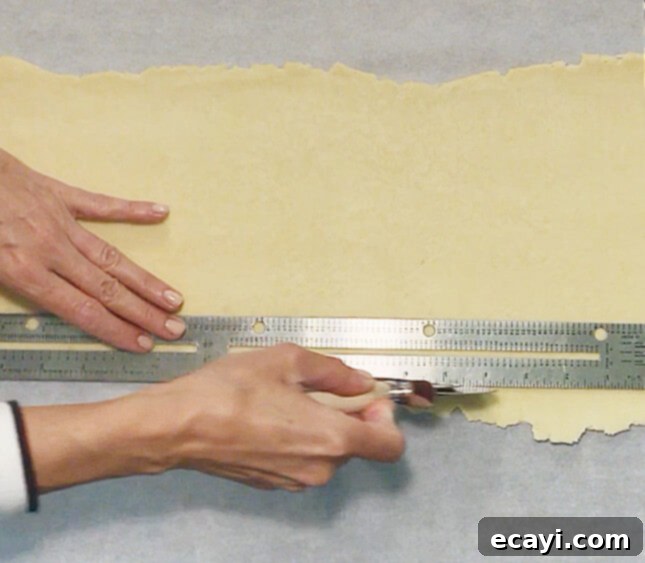
- Line two baking sheets with parchment paper. Remove the dough from the fridge and place a large piece of parchment paper (at least 48 inches/60 cm long) on your working surface. Let the chilled dough sit at room temperature for about 15 minutes. This slight warming will make it easier to roll without cracking. Roll the dough until you achieve a large rectangle, slightly over 8 x 24 inches (20 x 60 cm). This step requires patience; work slowly and evenly, and the dough will stretch to the required size. Trim the edges of the rectangle to ensure they are neat and straight. A clean ruler or tape measure and a pizza cutter are ideal for this. Remember to save any dough trimmings! They can be used to make delightful tiny sugared escargots (see notes at the end of the recipe for instructions).
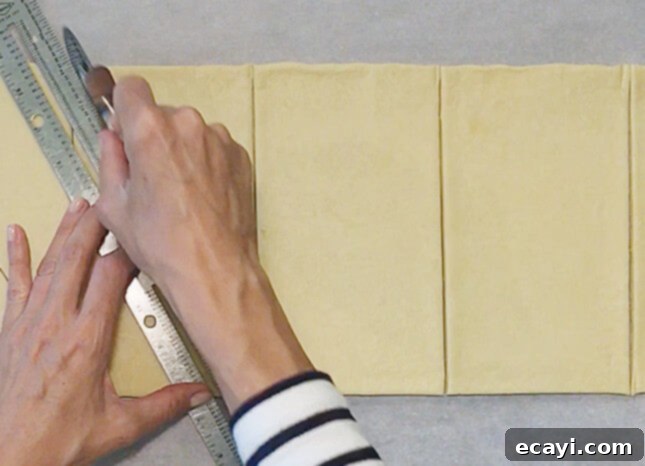
- Along the long sides of the rectangle, make small marks in the dough every 4 1/2 inches (12 cm). Place a ruler or tape measure across the width of the dough, aligning it with the first mark. Using a long, sharp knife or a pizza cutter, cut a clean rectangle across the entire width of the dough. Repeat this process at each subsequent mark until you have successfully created five even rectangles.
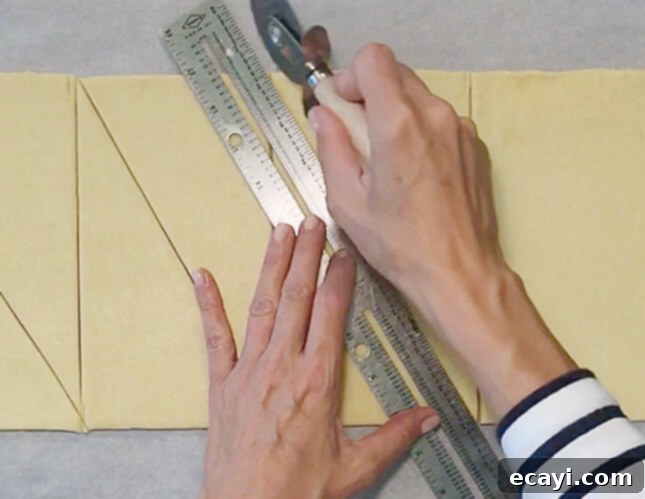
- Now, take each of the five rectangles and cut it diagonally in half to form two triangles. Use a ruler or tape measure to ensure precision and symmetry, and employ a pizza cutter for clean cuts. You will now have a total of 10 perfectly sized triangles ready for shaping.
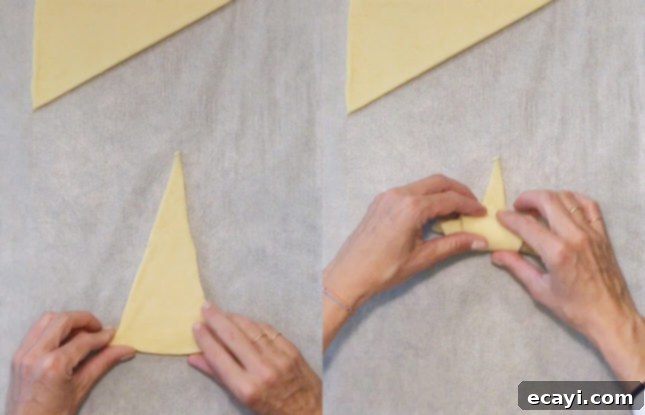
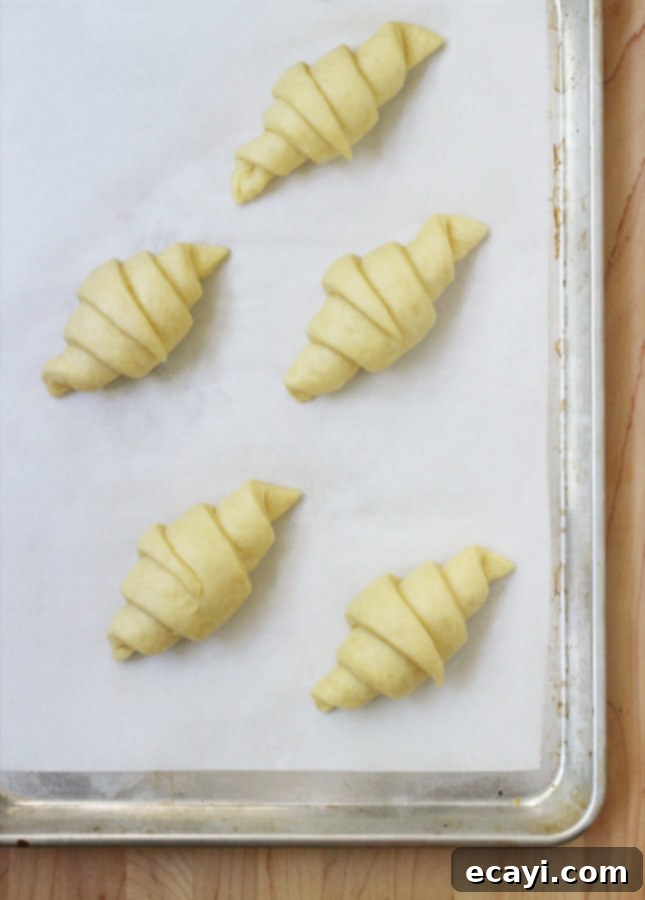
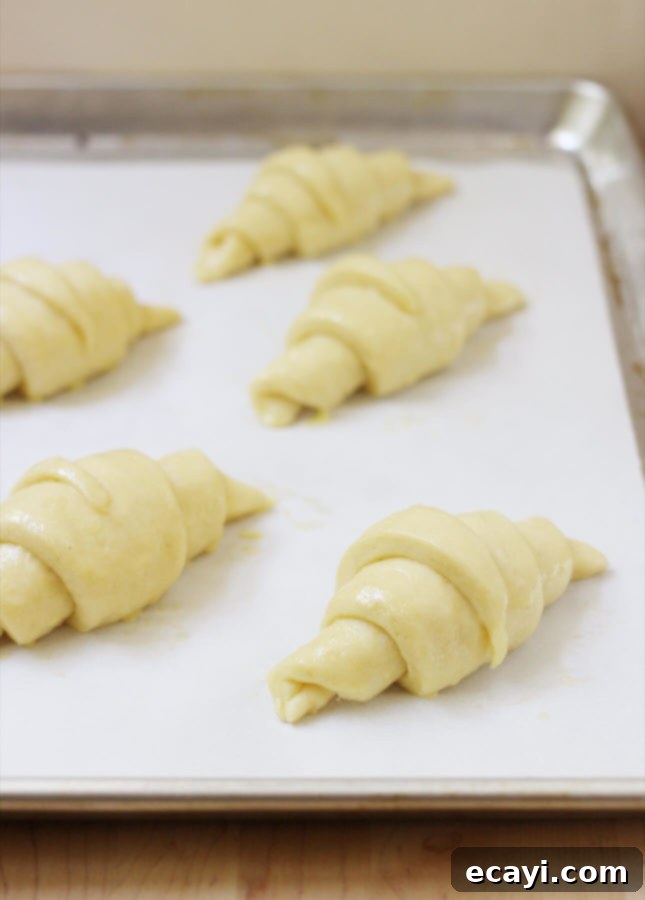
- To shape each croissant, gently stretch one of the triangles by lightly pulling on the side that forms the right angle. This action should cause both long sides of the triangle to angle slightly inwards towards the tip. Starting from the widest end of the triangle, carefully roll the dough towards the pointed end, creating the classic crescent shape. And voilà, you’ve just made a beautiful croissant!
- Repeat the shaping process with all the remaining triangles. Arrange five shaped croissants on each of the prepared parchment paper-lined baking trays. Cover each tray with a clean tea towel. Allow the croissants to rest and proof in a warm place for 3 hours. A turned-off oven with the light on is an ideal environment. During this resting period, the croissants will noticeably puff up as they proof.
- After the croissants have been resting for approximately 2 1/2 hours, preheat your oven to 375˚F (190˚C). It is crucial to ensure you remove the raw croissants from the oven first if that’s where you placed them to proof! In a small bowl, whisk together the egg and heavy cream to create an egg wash. Use a pastry brush to gently and evenly brush the tops of all the croissants with this mixture.
- Place one baking tray on the top third rack of your preheated oven and the second tray on the bottom third rack. Bake for 20 to 25 minutes, or until the croissants achieve a beautiful golden brown color on top. To ensure even baking, rotate the trays halfway through the baking time, switching their positions from top to bottom and turning them front to back.
- Once baked to perfection, carefully remove the baking trays from the oven. Allow the croissants to cool on the baking trays for about 10 minutes before transferring them to a wire rack to cool completely.

Storage Recommendations
These homemade croissants are truly at their peak when enjoyed freshly baked and still warm from the oven. For any leftovers, store them in a resealable plastic bag at room temperature for 2 to 3 days. To reheat and bring back some of their fresh-baked goodness, place them in a 300°F (150°C) oven for 8-10 minutes, or simply microwave for a few seconds until warmed through.
Helpful Notes and Variations
- Transform Dough Trimmings into Crunchy Sugared Escargots: Don’t let those dough trimmings go to waste! Roughly shape them into short, straight rods, then loosely roll each rod to create a flat, charming “snail” spiral shape. Allow these mini escargots to rest and proof alongside your main batch of croissants. Just before baking, brush them with the same egg and cream mixture and generously sprinkle with granulated sugar. Bake for 10 to 15 minutes, adjusting the time based on their size, until golden and caramelized. Let them cool completely for a delightful, crunchy snack.
- Create Delectable Pains au Chocolat with This Croissant Dough: This versatile croissant dough can also be used to make classic pains au chocolat (chocolate croissants). While Mardi’s cookbook provides detailed instructions, here’s a quick overview: instead of cutting the dough into triangles, cut it into 12 rectangles, each measuring approximately 3 x 6 inches (8 x 15 cm). Place one chocolate baking stick (or a small handful of chocolate chips) along the short side of one of the rectangles, then carefully roll the dough around it. Follow steps 15 to 18 of the main croissant recipe for the proofing and baking process. The result is a rich, chocolatey treat that’s just as satisfying!


Pin Recipe
Homemade Croissants
1 hour 30 minutes
25 minutes
8 hours 55 minutes
10 croissants
Marie Asselin, FoodNouveau.com, adapted from a recipe by Mardi Michel from the book In the French Kitchen with Kids
Ingredients
- 1/2 cup 125 ml whole milk (3.25 % m.f.) or partly skimmed milk (2% m.f.)
- 2 1/2 tsp 12 ml active dry yeast
- 1 1/2 cups 375 ml / 225 g all-purpose flour
- 1/4 cup 60 ml / 50 g granulated sugar
- 1 cup 250 ml / 226 g cold salted butter or European-style butter, cut into cubes
- All-purpose flour for rolling and shaping
- 1 egg lightly beaten
- 1 tbsp 15 ml heavy (35% m.f.) cream
Instructions
-
Heat the milk to between 110˚F and 113˚F (approx. 45˚C) in a medium saucepan set over medium heat (use a digital thermometer to check the temperature). Alternatively, you can heat the milk in the microwave. Start by heating the milk for 30 seconds at high, then stir and test the temperature. Keep heating by 10-second bursts if needed.
-
Pour the milk into a large heatproof bowl and sprinkle the yeast over it. Let it sit for 10 minutes. It will be frothy on top after this time.
-
Meanwhile, place the flour, sugar, and butter in the bowl of a food processor fitted with a metal blade. Pulse eight to ten times—you should still be able to see large chunks of butter.
-
Tip the flour and butter mixture over the warmed milk and use a wooden spoon to just incorporate the dry ingredients into the milk. The dough will be lumpy, shaggy, and quite dry at this point.
-
Use your hands to gather the dough into a ball. Cover the bowl tightly with plastic wrap and place it in the fridge for about 1 hour (don’t leave it much longer than this, because it will become too difficult to roll out).
-
Remove the dough from the fridge and lightly flour your countertop. Transfer the dough to the work surface. The dough will be very soft and sticky at this point, so you will likely need to sprinkle the top of the dough with flour as well. Shape it into a rough rectangle.
-
Lightly flour a rolling pin and roll out the dough until you have a very large rectangle (8 x 17 inches/20 x 40 cm). You should be able to see butter pieces in the dough. If the edges of the rectangle crack a little as you are rolling, simply push them together with your fingers and continue to roll until you have the correct size of rectangle.
-
With the largest side of the rectangle facing you, fold the dough about two-thirds of the way from left to right, then fold remaining third over the first fold. The dough will still be very soft and sticky at this point; use a pastry scraper or a large icing spatula to lift the dough more easily. The short side of the folded rectangle of dough should be facing you. Turn the dough clockwise so the long side of the rectangle now faces you. (You will most likely need to use the pastry scraper to help lift the folded dough.) This rolling and folding is known as a “turn.”
-
Lightly flour the working surface around the folded dough, and the top of the dough again, then lightly flour the rolling pin again. Repeat Steps 7 through 9 seven times for a total of eight “turns.” Sprinkle flour to prevent the dough from sticking, being careful to add only what you need. With each roll, fold, and turn, you will feel the dough become smoother and easier to handle.
-
Once you’re done with the 8 turns, fold the dough one last time and wrap it tightly in plastic wrap. Refrigerate for a minimum of 3 hours, but preferably overnight.
-
Line two baking sheets with parchment paper. Remove the dough from the fridge and place a large piece of parchment paper (at least 48 inches-/60 cm-long) on your working surface. Let the chilled dough sit for about 15 minutes so it’s not completely cold when you start working with it. Roll the dough until you have a rectangle that is a little over 8 x 24 inches (20 x 60 cm). This may take a bit of patience, but if you take it slowly, the dough will definitely roll out this large. Trim the edges of the rectangle so they are neat and straight—a clean ruler or a tape measure and a pizza cutter work well to do this. Save the dough trimmings to make tiny sugared escargots. See note at the end of the recipe for instructions.
-
Working along the long sides of the rectangle, make a small cut in the dough on each side of the rectangle every 4 1/2 inches (12 cm). Place a ruler or a tape measure across the width of the dough at the first mark. Use a long sharp knife or a pizza cutter to cut a rectangle across the width of the dough. Repeat at each mark until you have five rectangles.
-
Cut each rectangle in two diagonally to make two triangles. Use a ruler or a tape measure (to make sure the triangles are even) and a pizza cutter to do this. You’ll have 10 triangles.
-
Gently stretch one of the triangles by pulling on the right-angle side so that both long sides of the triangle are angled towards the tip. Working from the wide end, roll up the dough until you have reached the pointed end. Voilà, you have a croissant!
-
Repeat with the remaining triangles. Place five croissants on each tray and cover each tray with a clean tea towel. Leave to rest in a warm place (such as a turned off oven with the light on) for 3 hours. The croissants will puff up slightly during this time.
-
When the croissants have been resting for 2 1/2 hours, preheat the oven to 375˚F (190˚C)—making sure to remove the raw croissants from the oven if that’s where you rested them. Whisk the egg and cream together and use a pastry brush to gently brush the tops of the croissants with this egg wash.
-
Place one tray in the top third of your oven and the other in the bottom third of the oven. Bake for 20 to 25 minutes, or until the croissants are golden brown on top. Switch the trays from top to bottom and turn them from front to back halfway through baking.
-
Remove the baking trays from the oven. Let the croissants sit on the baking trays for about 10 minutes, then place them on a wire rack to cool completely.
STORAGE
-
These croissants are at their very best enjoyed freshly baked. Store leftovers for 2 to 3 days in a resealable plastic bag. To reheat, place in a 300°F (150°C) oven for 8-10 minutes, or microwave for a few seconds.
Notes
- Make crunchy sugared escargots with croissant dough trimmings: Roughly shape the dough trimmings into straight rods, then loosely roll to create a flat “snail” shape. Let rest along with the croissants, then brush with the egg and cream mixture and generously sprinkle with granulated sugar. Bake for 10 to 15 minutes, depending on the size of the escargots. Let cool completely and enjoy.
- Use croissant dough to make pains au chocolat: You can use this same dough to make pains au chocolat (chocolate croissants). You’ll find detailed instructions in Mardi’s cookbook, but here’s what you need to do, in a nutshell: instead of cutting the dough into triangles, cut it into 12 3 x 6 inches (8 x 15 cm) rectangles. Place one chocolate baking stick or some chocolate chips along the short side of one of the rectangles, then roll. Follow steps 15 to 18 above for the resting and baking process. Enjoy!
Did you make this?
Tell me how you liked it! Leave a comment or take a picture and tag it with @foodnouveau on Instagram.
This recipe was adapted from In the French Kitchen with Kids by Mardi Michels. Copyright © 2018 Mardi Michels. Photography © Kyla Zanardi. Published by Appetite by Random House®, a division of Penguin Random House Canada Limited. Reproduced by arrangement with the Publisher. All rights reserved.
Disclosure notice: I received a complimentary copy of the book In the French Kitchen with Kids for review purposes.
This site is a participant in the Amazon Associates Program, an affiliate advertising program designed to provide a means for the site to earn fees by linking to Amazon and affiliated sites.
If you click on an affiliate link, I may earn advertising or referral fees if you make a purchase through such links, at no extra cost to you. This helps me creating new content for the blog–so thank you! Learn more about advertising on this site by reading my Disclosure Policy.
