Delicious & Easy Patriotic Chocolate Covered Strawberries: Your Ultimate Holiday Dessert Guide
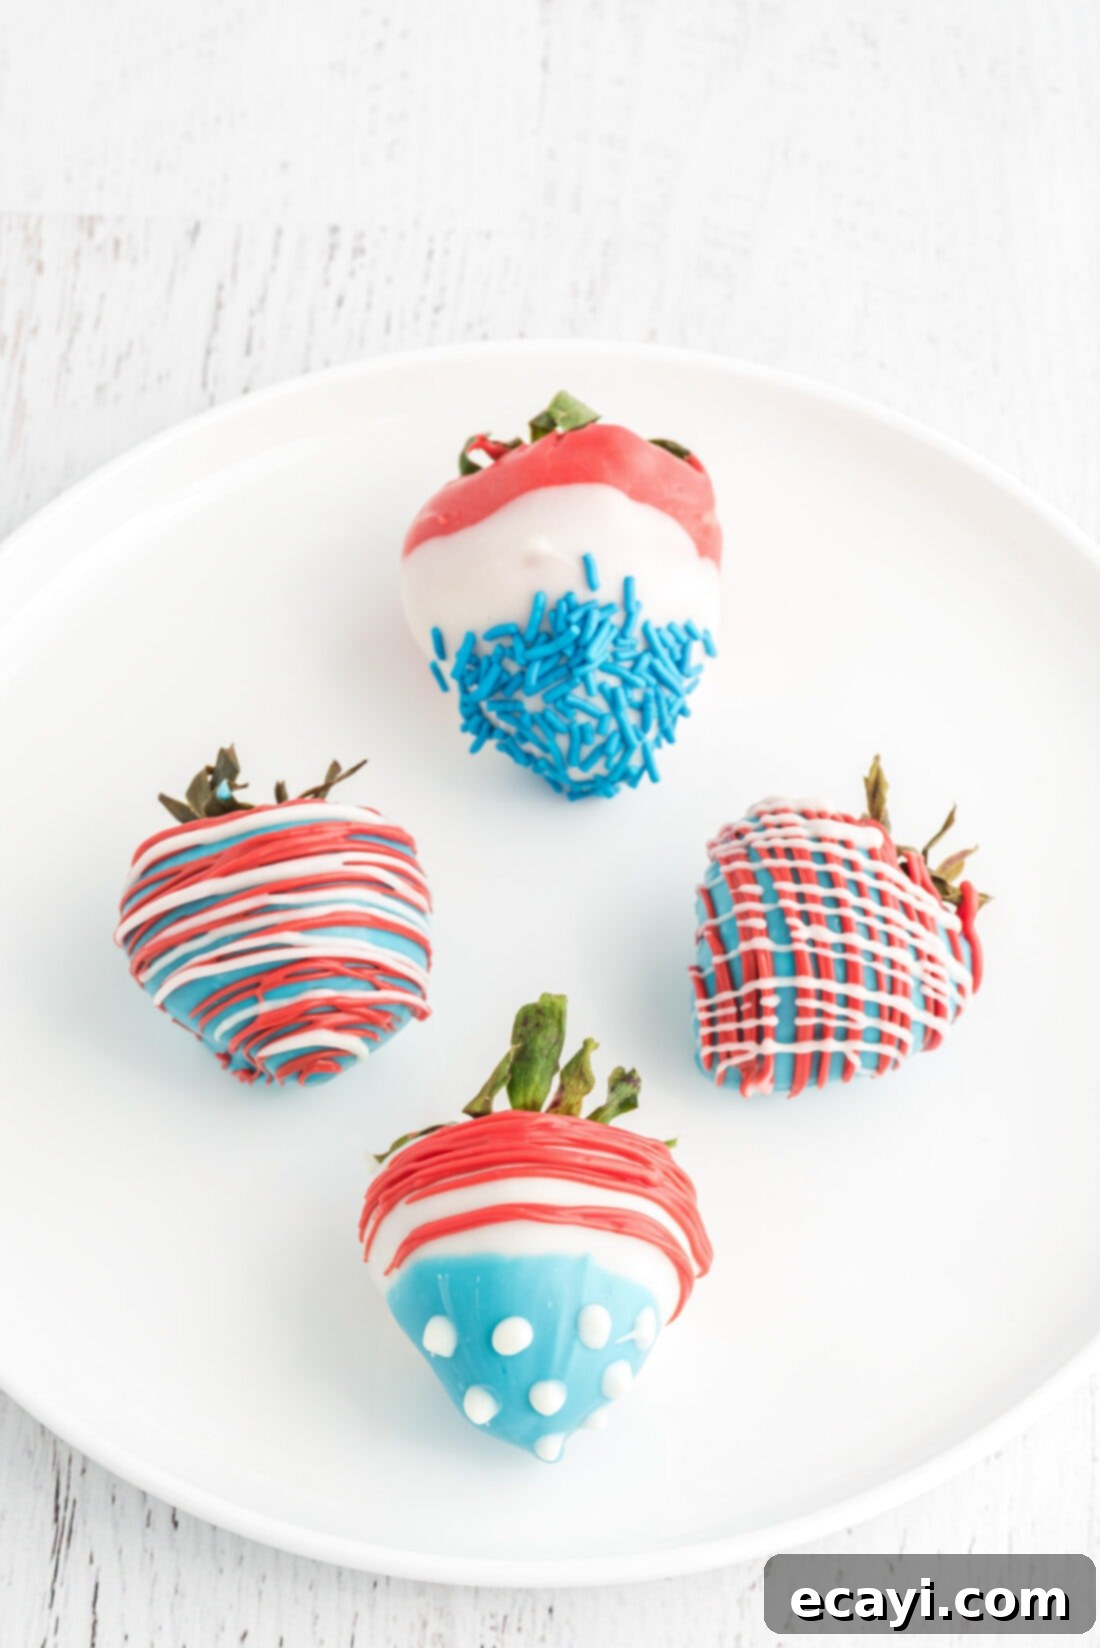
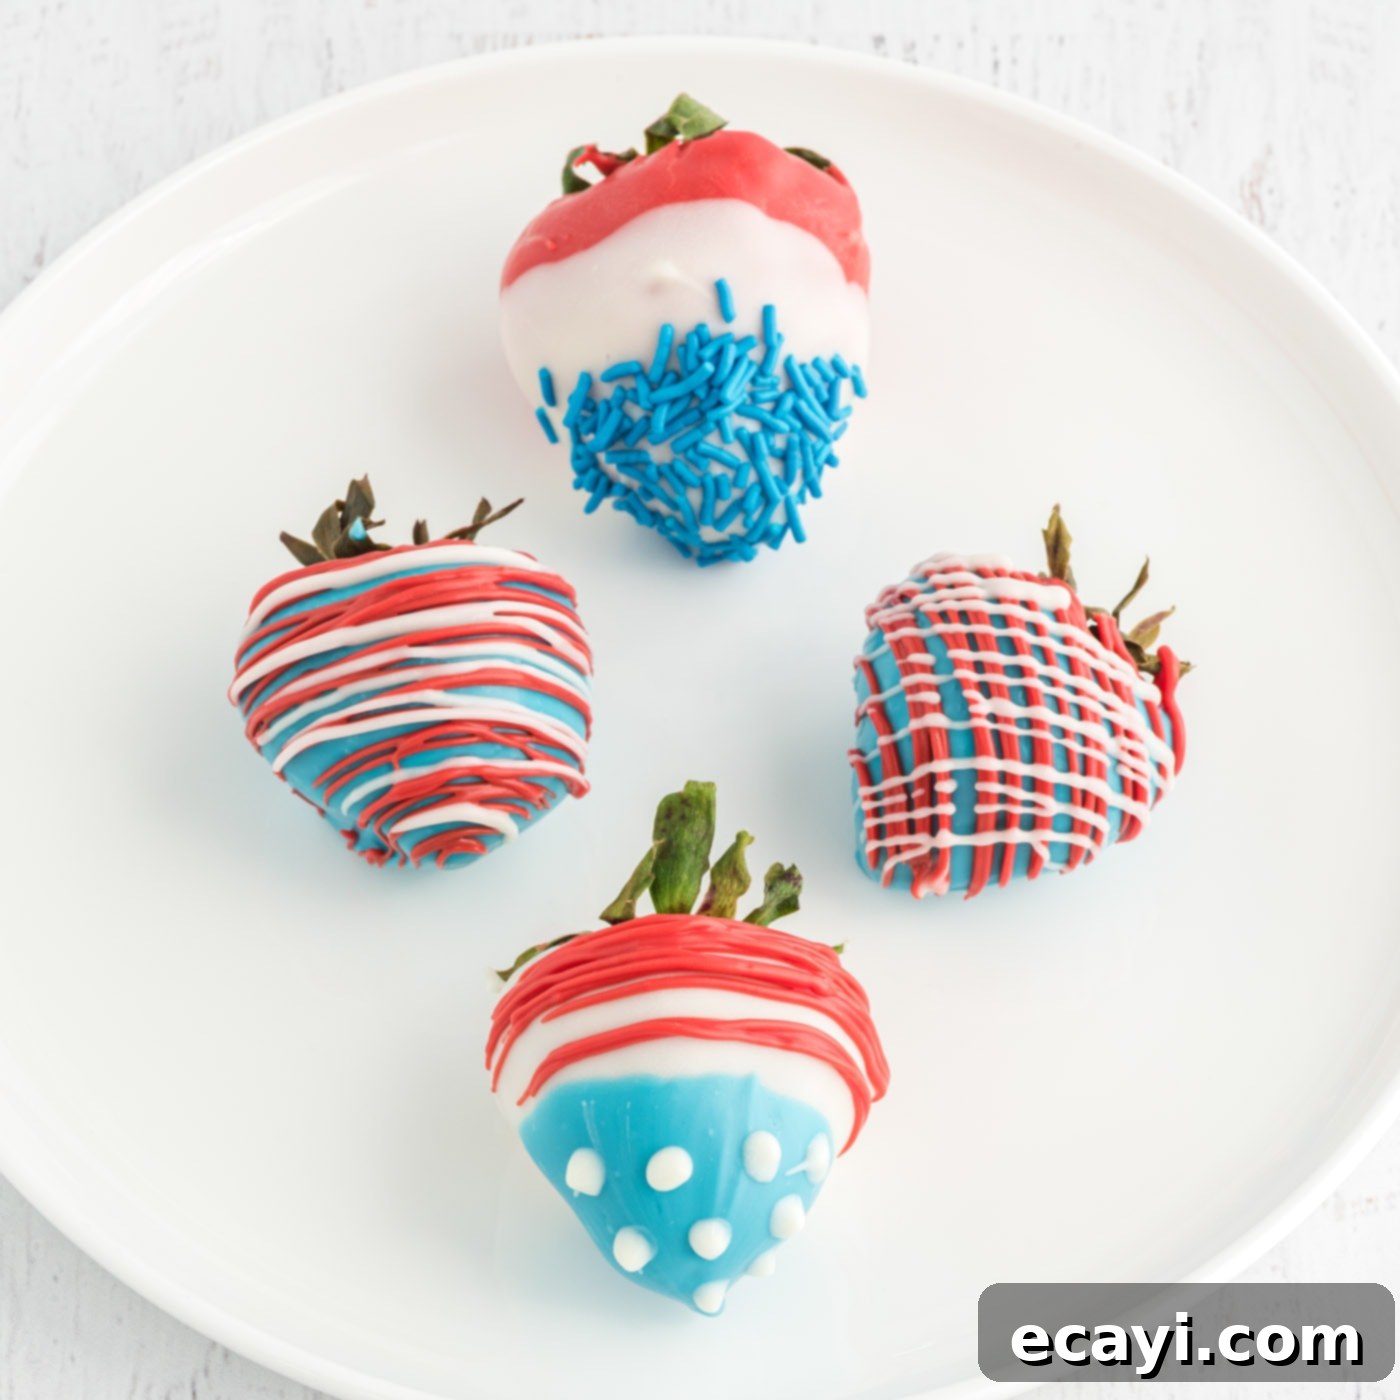
Celebrate America’s spirit with these incredibly simple yet stunning patriotic chocolate covered strawberries! Dazzled in vibrant red, white, and blue sprinkles and rich melted chocolate, they add the perfect festive touch to any holiday dessert table. Whether you’re hosting a grand barbecue or a cozy family gathering, these treats are sure to be a crowd-pleaser, embodying the joy and festivity of our national holidays.

Why This Recipe Is Your Go-To for Patriotic Celebrations
Chocolate covered strawberries are a timeless classic, offering a delightful combination of fresh fruit and rich sweetness. But when infused with patriotic flair, they transform into something truly special. This recipe stands out for several compelling reasons, making it your ultimate dessert solution for any American holiday.
Firstly, its **simplicity** is unmatched. You don’t need to be an experienced baker or a culinary artist to create these beautiful treats. The process involves just a few straightforward steps: washing and drying the strawberries, melting the chocolate, dipping, and decorating. Even novice cooks can achieve impressive results, making them an accessible option for everyone.
Secondly, these patriotic chocolate covered strawberries are incredibly **versatile**. While perfect for the 4th of July, their red, white, and blue theme makes them ideal for Memorial Day, Veterans Day, Flag Day, or even Labor Day celebrations. They fit seamlessly into any festive spread, adding a pop of color and a touch of elegance without overwhelming other dishes.
Thirdly, they offer a **decadent yet light** dessert experience. Strawberries provide a refreshing, juicy counterpoint to the sweet chocolate coating, creating a balanced treat that satisfies without feeling overly heavy. This makes them a fantastic alternative to traditional cakes or pies, especially during warmer months.
Finally, the **visual appeal** is undeniable. The vibrant colors and playful sprinkles instantly capture attention, making them a stunning centerpiece on your dessert table. Guests will be impressed by their appearance, and even more so by their delicious taste. They’re quick to assemble but look like they took hours of effort.
Serve these patriotic chocolate covered strawberries at your 4th of July, Memorial Day, Flag Day, or Veterans Day get-togethers to bring a smile to everyone’s face and celebrate with a sweet, festive treat.
We like to use a double boiler for melting our chocolate. This method helps maintain a consistent, gentle heat, preventing the chocolate from clumping, scorching, or seizing, ensuring a silky-smooth coating every time.
Key Ingredients & Smart Substitutions for Perfect Strawberries
Crafting the perfect patriotic chocolate covered strawberries starts with selecting the right ingredients. Here’s a detailed look at what you’ll need and how you can make smart substitutions to fit your preferences or pantry.
STRAWBERRIES: The Foundation of Your Dessert
The star of this show is, of course, the strawberry. For the best results, always choose **firm, ripe, and vibrant red strawberries**. Avoid any that are soft, bruised, or have white spots, as these will affect both taste and texture. Look for berries that are roughly the same size, preferably large and plump. This ensures a consistent look and an enjoyable bite for each chocolate-covered treat. For this recipe, approximately 2 pounds, which translates to about 18-20 evenly sized, large strawberries, is ideal. Before dipping, make sure to wash your strawberries thoroughly and, most importantly, dry them completely. Any moisture on the berries will cause the chocolate to seize or create a lumpy, uneven coating, so pat them dry with paper towels until absolutely no water remains.
CHOCOLATE: The Essential Coating
For the white base of your patriotic design, we recommend **white chocolate chips**. They melt smoothly and provide a neutral canvas for coloring. However, you have excellent alternatives:
- Vanilla Almond Bark: This is a popular choice for melting and dipping because it contains vegetable fats that help it melt smoothly and set quickly without needing tempering. It offers a subtle vanilla flavor.
- White Candy Wafers (Candy Melts): These are specifically designed for melting and dipping. They come in various colors, making them incredibly easy to use. For your red and blue elements, pre-colored red and blue candy melting wafers are a fantastic time-saver, eliminating the need for food coloring.
If you prefer to color your own white chocolate for the red and blue accents, ensure you use **gel food coloring**. Liquid food coloring can introduce too much water into the chocolate, causing it to seize. Gel colors are concentrated and won’t thin out your chocolate, providing vivid hues. Alternatively, using separate red and blue candy melts directly is the easiest way to get those distinct colors.
SPRINKLES: The Festive Finishing Touch
No patriotic treat is complete without a shower of red, white, and blue sprinkles! These not only add visual appeal but also a delightful textural crunch. Here are some options:
- Nonpareils: These tiny, round sprinkles offer a fine, classic look and a satisfying crunch.
- Jimmies: Also known as sprinkles or strands, Jimmies provide a softer bite and come in vibrant colors.
- Mini Star Sprinkles: For an extra patriotic touch, star-shaped sprinkles are a fun and themed addition.
- Colored Sanding Sugar: This fine, crystalline sugar adds sparkle and a delicate crunch, perfect for a more elegant finish.
Feel free to mix and match different types of sprinkles for varied textures and visual interest. A combination of all three red, white, and blue types creates a dynamic and celebratory look.
How to Make Patriotic Chocolate Covered Strawberries: A Step-by-Step Guide
Creating these festive chocolate covered strawberries is a fun and rewarding process. Follow these detailed steps to ensure your treats are not only beautiful but also perfectly delicious.
Step-by-Step Instructions for Dipping
1. Prepare Your Workspace: Begin by lining a large sheet pan with waxed paper or parchment paper. This non-stick surface is crucial for the strawberries to set without sticking. Place this lined sheet pan into the freezer to chill. A cold surface helps the chocolate set more quickly and maintain its smooth finish. Next, gently insert a wooden skewer or a sturdy toothpick into the stem end of each clean, dry strawberry. This will serve as a convenient handle for dipping.
2. Set Up for Melting: Separate your blue candy melts, red candy melts, and white chocolate (chips, almond bark, or wafers) into three individual glass or other heat-proof bowls. Prepare three saucepans, each with about 2 inches of water, and bring the water in all three to a gentle simmer over medium heat. Once simmering, turn off the heat. Carefully place a bowl of chocolate over each saucepan, ensuring the bottom of the bowl does not touch the water. The residual heat from the simmering water will gently melt the chocolate. Stir each bowl of chocolate occasionally until it becomes completely smooth and fluid. This double boiler method prevents scorching and ensures a perfect consistency for dipping. If using the microwave, heat in 30-second intervals, stirring thoroughly after each, until smooth, but be cautious not to overheat.
3. Dip the Strawberries: Remove the chilled sheet pan from the freezer. Holding a strawberry by its skewer, immerse it into the melted chocolate. You can dip it fully, halfway, or at an angle, depending on your desired base color. Lift the strawberry out of the chocolate, gently turning and tilting it to allow any excess chocolate to drip back into the bowl. This helps create a thin, even coating and prevents pooling at the bottom. Once dipped, carefully place the berry onto the chilled, lined sheet pan. Repeat this process with all remaining strawberries, alternating between the blue, red, and white chocolate bases as you wish. Allow the initial chocolate layer to set for a few minutes on the chilled pan before proceeding with decoration.
Creative Decorating Options
This is where your patriotic chocolate covered strawberries truly come to life! You can be as simple or as elaborate as you like. We often use white chocolate as the primary base for many berries, allowing the red strawberry itself to serve as one of the colors, then topping with blue and red details. Get creative with these ideas:
- Classic Drizzles: For a clean and elegant look, drizzle contrasting melted chocolate over your dipped strawberries. To do this, transfer a small amount of melted chocolate (or candy melts) into a piping bag or a small plastic zipper bag. Snip off a tiny piece from one corner of the bag. Gently squeeze and move the bag in horizontal lines over the strawberries, creating a delicate striped effect. Alternatively, dip a fork into the melted chocolate and wave it back and forth over the berries for a more rustic, artistic drizzle.
- Red, White, and Blue Layered Dip: Achieve a striking tri-color effect. Start by dipping a strawberry into red chocolate (or simply use a plain red strawberry as your “red” base). Let it set for a moment. Then, dip the berry about two-thirds of the way into white chocolate and allow it to set. Finally, carefully dip just the very tip or the bottom third of the berry into blue sprinkles before the white chocolate fully hardens. The sprinkles will adhere beautifully, creating distinct red, white, and blue sections. This method works well with Jimmies, nonpareils, or coarse decorating sugar for the blue section.
- American Flag Berries: Create miniature edible flags! First, dip a strawberry entirely into white chocolate and let it set. Once firm, dip the bottom portion (about one-third) of the berry into blue chocolate and let that set as well. Now for the details: use melted red chocolate (in a piping bag with a tiny snipped corner) to carefully draw thin horizontal lines over the white portion of the strawberry, mimicking the red stripes of the flag. For the “stars” on the blue field, you can either dot the blue section with tiny drops of white chocolate using a toothpick or, for an even more celebratory look, carefully place small white star sprinkles onto the blue chocolate before it completely sets.
Once decorated, allow all the chocolate to fully harden. You can place them back in the refrigerator for 10-15 minutes to speed up this process, especially if your kitchen is warm.
Expert Tips for Perfect Patriotic Chocolate Covered Strawberries
- Serving and Storage: Chocolate covered strawberries are best enjoyed the day they are made, when the strawberries are freshest and the chocolate is at its prime. However, you can prepare them the night before if needed. Store them in an airtight container in the refrigerator. Be aware that berries may start to “sweat” (develop condensation) as they sit in the refrigerator dueol of the temperature difference when brought to room temperature.
- Melting Mastery: Always prioritize slow and gentle melting. Using a double boiler (a heat-proof bowl set over a saucepan of simmering water) is the safest method. It provides indirect, even heat, preventing the chocolate from scorching, seizing, or becoming lumpy. While the microwave can be used, do so with extreme caution, heating in short bursts (15-30 seconds) and stirring thoroughly between each to prevent overheating.
- Drying is Key: Ensure your strawberries are absolutely, thoroughly dry before dipping. Any trace of water can cause the chocolate to seize and become grainy or prevent it from adhering smoothly to the fruit. Pat them dry with paper towels until there is no visible moisture.
- Perfect Consistency: If your melted chocolate seems too thick for smooth dipping or drizzling, you can thin it slightly. For pure chocolate, add a tiny amount (1/4 to 1/2 teaspoon) of neutral oil (like coconut oil or vegetable oil). For candy melts, add a small amount of paramount crystals or vegetable shortening (like Crisco). Add very small amounts at a time and stir until the desired consistency is reached.
More Festive Patriotic Recipes
- Taco Salad Flag
- American Flag Cupcakes
- Patriotic Mini Cheesecakes
- Red White and Blue Poke Cake
- Patriotic Ice Cream Cone Cupcakes
I love to bake and cook and share my kitchen experience with all of you! Remembering to come back each day can be tough, that’s why I offer a convenient newsletter every time a new recipe posts. Simply subscribe and start receiving your free daily recipes!

Patriotic Chocolate Covered Strawberries
IMPORTANT – There are often Frequently Asked Questions within the blog post that you may find helpful. Simply scroll back up to read them!
Print It
Pin It
Rate It
Save ItSaved!
Ingredients
- 2 pounds strawberries about 18-20 berries evenly sized
- 6 ounces blue candy melts
- 6 ounces red candy melts
- 12 ounces white chocolate candy melts, almond bark, or white chocolate chips
- red, white, and blue sprinkles optional for decorating. Nonpariels, Jimmies, colored sanding sugar, or star sprinkles
Things You’ll Need
-
Double boiler
-
Wooden skewers
Before You Begin
- Chocolate covered strawberries are best served the day they are made, however, you can prep them the night before if you are on a time crunch. Keep them in an air-tight container kept in the refrigerator. The berries may begin to sweat as they sit in the refrigerator.
- We used white chocolate chips for the white base, but vanilla almond bark or white candy wafers work as well. You will also want to grab either red and blue gel food coloring to tint the white for decorating or simply use red and blue candy wafers to save you some prep time.
- Use a double boiler or a bowl set onto a saucepan of simmering water to melt your chocolate. The microwave will work, but if left in too long can scorch the chocolate and ruin the consistency. Slow melting is much safer and produces smooth, silky chocolate.
- You can use a fork dipped in melted chocolate to drizzle. If you want to be more precise, put some melted chocolate in a plastic zipper bag and snip a tiny piece off the corner. This will act as a piping bag and you will have more control and be able to drizzle slowly.
Instructions
-
First, line a sheet pan with waxed or parchment paper and place it in the freezer to chill. Insert a skewer into the stem end of each strawberry.
-
Place the chocolate and candy melts into separate glass or heat proof bowls.
-
Put about 2 inches of water into three saucepans and bring to a simmer over medium heat. Turn off the heat and set the bowls of chocolate over the water to melt. Stir chocolate until smooth.
-
Remove the sheet pan from the freezer.
-
Using the skewer as a handle, dip the fruit into the chocolate. Lift and turn, allowing excess chocolate to drip back into the bowl. Place dipped berries on the chilled lined sheet pan.
-
Repeat with remaining strawberries.
Decorating Options
-
Have fun with the designs. We switched between colors mainly using white chocolate as the base but also dipped some of the berries into blue as the base. Then top with the remaining two colors in any design/pattern you would like.
-
FOR DRIZZLING – add the melted chocolate to a piping bag or ziplock bag with the corner snipped off and gently drizzle in horizontal lines. You could also dip a fork into melted chocolate/candy melts and drizzle over the dipped strawberries.
-
RED WHITE AND BLUE – Dip the berry into red chocolate first (or leave the berry plain, its red on its own!), allow to set, then dip in white chocolate a little more than half way up the berry. Carefully roll the end in blue sprinkles before the chocolate sets. For the blue sprinkles you can use either Jimmies, nonpareils, or coarse decorating sugar.
-
FLAG BERRIES – Dip the berry into white chocolate, allow to set, then dip the end of the berry into blue chocolate and allow to set. Drizzle red lines over the white portion and dot the blue portion with white chocolate to mimic the look of the flag. You could also add white star sprinkles instead of dotting with white chocolate.
Nutrition
The recipes on this blog are tested with a conventional gas oven and gas stovetop. It’s important to note that some ovens, especially as they age, can cook and bake inconsistently. Using an inexpensive oven thermometer can assure you that your oven is truly heating to the proper temperature. If you use a toaster oven or countertop oven, please keep in mind that they may not distribute heat the same as a conventional full sized oven and you may need to adjust your cooking/baking times. In the case of recipes made with a pressure cooker, air fryer, slow cooker, or other appliance, a link to the appliances we use is listed within each respective recipe. For baking recipes where measurements are given by weight, please note that results may not be the same if cups are used instead, and we can’t guarantee success with that method.
